Author: 779rd5fmjvci

  • naive-redis-vs-postgres-benchmark

    Naive Redis vs PostgreSQL Benchmark

    This repository contains a simple benchmark to compare Redis and PostgreSQL (unlogged table) for a cache-like scenario. The benchmark evaluates common operations such as INSERT, SELECT, UPDATE, and DELETE using both single-threaded and multi-threaded approaches.

    Features

    • Benchmarks Redis using the StackExchange.Redis library.
    • Benchmarks PostgreSQL unlogged tables using the Npgsql library.
    • Configurable number of operations and threads.
    • Measures total execution time for each operation type.

    Prerequisites

    • Redis and PostgreSQL servers running and accessible.
    • .NET 6 SDK or later installed.

    Configuration

    PostgreSQL Setup

    Ensure your PostgreSQL server is running and accessible. The benchmark uses the following table schema:

    CREATE UNLOGGED TABLE benchmark_table_77 (
        key         TEXT PRIMARY KEY NOT NULL,
        value       TEXT NOT NULL,
        changed_at  timestamptz NULL
    );

    Update the connection string in the code to match your PostgreSQL server credentials:

    private static string PostgresConnectionString = "Server=192.168.0.140;Port=5432;Database=postgres;User Id=postgres;Password=;Maximum Pool Size=100;Minimum Pool Size=11;";

    Redis Setup

    Ensure your Redis server is running and accessible. Update the connection string in the code to match your Redis server:

    private static ConnectionMultiplexer RedisConnection = ConnectionMultiplexer.Connect("192.168.0.140");

    Usage

    1. Clone this repository:

      git clone https://github.com/GustavoHennig/naive-redis-vs-postgres-benchmark.git
      cd naive-redis-vs-postgres-benchmark
    2. Build and run the project:

      dotnet run --configuration Release
    3. The program will execute the benchmarks for both Redis and PostgreSQL in:

      • Single-threaded mode: Perform operations sequentially.
      • Multi-threaded mode: Perform operations concurrently using multiple threads.

    Configurable Parameters

    You can adjust the following parameters in RedisVsPostgres:

    • Number of Operations: Total operations to perform.
    • Number of Threads: Number of threads for multi-threaded benchmarks (default: number of CPU cores).

    Example:

    RedisVsPostgres.NumberOfThreads = 4;
    RedisVsPostgres.NumberOfOperations = 50_000;

    Output

    The benchmark will print execution times for INSERT, SELECT, UPDATE, and DELETE operations for both Redis and PostgreSQL, along with total time taken.

    Benchmark Results

    • Redis on Fedora with default settings
    • PostgreSQL 16 on Fedora with shared_buffers = 2028MB
    • Running on a 24-core machine
    • The server is running in another machine on the same network

    Running single-thread...
    PostgreSQL Insert: 1707 ms
    PostgreSQL Select: 1549 ms
    PostgreSQL Update: 1690 ms
    PostgreSQL Delete: 1573 ms
    PostgreSQL summary
    Ops: 10000; Threads: 1; Total time: 6530 ms
    Redis Insert: 1491 ms
    Redis Read: 1427 ms
    Redis Update: 1386 ms
    Redis Delete: 1355 ms
    Redis summary
    Ops: 10000; Threads: 1; Total time: 5662 ms
    
    
    Running multi-thread...
    PostgreSQL
    Ops: 100000; Threads: 24; Total time: 2880 ms
    
    Redis
    Ops: 100000; Threads: 24; Total time: 2618 ms


    Conclusion

    I tested several configurations, and the results were consistent. PostgreSQL was occasionally even faster than Redis, but their performance was generally similar.

    Notes

    • PostgreSQL unlogged tables are used for higher write performance but do not provide crash safety.
    • The benchmark is a simple comparison and do not reflect real-world scenarios.
    • The benchmark does not account for cache expiration or complex query scenarios.
    • Thanks for this beautiful README file, ChatGPT!

    Visit original content creator repository
    https://github.com/GustavoHennig/naive-redis-vs-postgres-benchmark

  • OttoIFL

    Visit original content creator repository
    https://github.com/sfranzyshen/OttoIFL

  • jacoco-parser

    jacoco-parser

    A quick script to parse jacoco html report to generate code coverage numbers. Shamelessly borrowed the idea from tavvasubbareddy’s JacocoUtils in Java.

    Jacoco Coverage Report

    index.html is a test coverage report file from Jacoco’s own coverage report. It is a single line html file that contains coverage summary. The summary data looks like this (pretty printed):

    ...
    <thead>
            <tr>
              <td class="sortable" id="a" onclick="toggleSort(this)">Element</td>
              <td class="down sortable bar" id="b" onclick="toggleSort(this)">Missed Instructions</td>
              <td class="sortable ctr2" id="c" onclick="toggleSort(this)">Cov.</td>
              <td class="sortable bar" id="d" onclick="toggleSort(this)">Missed Branches</td>
              <td class="sortable ctr2" id="e" onclick="toggleSort(this)">Cov.</td>
              <td class="sortable ctr1" id="f" onclick="toggleSort(this)">Missed</td>
              <td class="sortable ctr2" id="g" onclick="toggleSort(this)">Cxty</td>
              <td class="sortable ctr1" id="h" onclick="toggleSort(this)">Missed</td>
              <td class="sortable ctr2" id="i" onclick="toggleSort(this)">Lines</td>
              <td class="sortable ctr1" id="j" onclick="toggleSort(this)">Missed</td>
              <td class="sortable ctr2" id="k" onclick="toggleSort(this)">Methods</td>
              <td class="sortable ctr1" id="l" onclick="toggleSort(this)">Missed</td>
              <td class="sortable ctr2" id="m" onclick="toggleSort(this)">Classes</td>
            </tr>
          </thead>
          <tfoot>
            <tr>
              <td>Total</td>
              <td class="bar">1,323 of 26,881</td>
              <td class="ctr2">95%</td>
              <td class="bar">141 of 2,074</td>
              <td class="ctr2">93%</td>
              <td class="ctr1">209</td>
              <td class="ctr2">2,558</td>
              <td class="ctr1">328</td>
              <td class="ctr2">6,228</td>
              <td class="ctr1">77</td>
              <td class="ctr2">1,489</td>
              <td class="ctr1">15</td>
              <td class="ctr2">289</td>
            </tr>
          </tfoot>
    ...

    The script then uses regex to find those <td> element values and return a dictionary structure using counter name as key and a tuple (missed, total, coverage_pct) as value.

    Usage

    > python jacoco_parser/parser.py path_to_index.html [path_to_old_index.html]

    Parse and print one coverage report data

    > python jacoco_parser.parser.py index.html
    counter: METHODS - missed: 77, total: 1,489, coverage: 94.8287441236%
    counter: CXTY - missed: 209, total: 2,558, coverage: 91.8295543393%
    counter: INSTRUCTION - missed: 1,323, total: 26,881, coverage: 95.0783080987%
    counter: LINES - missed: 328, total: 6,228, coverage: 94.7334617855%
    counter: CLASSES - missed: 15, total: 289, coverage: 94.8096885813%
    counter: BRANCH - missed: 141, total: 2,074, coverage: 93.2015429122%

    Compare and print two coverage reports difference

    > python jacoco_parser.parser.py index.html index_old.html
    counter: METHODS - missed: 77, total: 1,489, coverage: 94.8287441236%, change: 1.25684220177%
    counter: CXTY - missed: 209, total: 2,558, coverage: 91.8295543393%, change: 0.132672540923%
    counter: INSTRUCTION - missed: 1,323, total: 26,881, coverage: 95.0783080987%, change: 1.73620956318%
    counter: LINES - missed: 328, total: 6,228, coverage: 94.7334617855%, change: 0.303244115831%
    counter: CLASSES - missed: 15, total: 289, coverage: 94.8096885813%, change: 0.974072142959%
    counter: BRANCH - missed: 141, total: 2,074, coverage: 93.2015429122%, change: 2.19400995556%

    Methods

    get_stats returns the coverage data summary in a dictionary:

    {'METHODS': ('77', '1,489', 94.82874412357287), 'CXTY': ('209', '2,558', 91.8295543393276), 'INSTRUCTION': ('1,323', '26,881', 95.07830809865705), 'LINES': ('328', '6,228', 94.7334617854849), 'CLASSES': ('15', '289', 94.80968858131487), 'BRANCH': ('141', '2,074', 93.20154291224686)}

    diff_stats returns the coverage data difference in a dictionary.

    Visit original content creator repository
    https://github.com/guozheng/jacoco-parser

  • secure-multiparty-computation-sandbox

    Joint Signature Scheme with Elliptic Curve Cryptography (ECC) for Secure Multi-Party Computation (SMPC)

    This is a production-friendly Python implementation of a joint signature scheme using Elliptic Curve Cryptography (ECC) for Secure Multi-Party Computation (SMPC). The implementation utilizes the ecdsa library for ECC operations and the SECP256k1 Elliptic Curve.

    Functions

    generate_key_pair()

    This function generates a key pair consisting of a private key (sk) and a corresponding public key (vk) using the SECP256k1 curve.

    Parameters:

    • None

    Returns:

    • sk: A private key generated using the SECP256k1 curve.
    • vk: The corresponding public key derived from the private key.

    generate_shared_secret(vk_list)

    This function generates a shared secret by deriving a key from the given list of public keys (vk_list).

    Parameters:

    • vk_list: A list of public keys from the participating parties.

    Returns:

    • sk_derived: A derived secret key based on the shared secret.

    joint_sign(sk, vk_list, message)

    This function generates a joint signature by deriving a shared secret from the given list of public keys (vk_list) and signing the provided message using the private key sk.

    Parameters:

    • sk: A private key used for joint signature generation.
    • vk_list: A list of public keys from the participating parties.
    • message: The message to be signed.

    Returns:

    • signature: The joint signature generated using the shared secret and the provided message.

    joint_verify(vk_list, message, signature)

    This function verifies a joint signature by deriving a shared secret from the given list of public keys (vk_list) and using the derived public key to verify the provided signature against the message.

    Parameters:

    • vk_list: A list of public keys from the participating parties.
    • message: The message that was signed.
    • signature: The joint signature to be verified.

    Returns:

    • valid: A boolean value indicating whether the joint signature is valid (True) or not (False).

    Example Usage

    # Generate key pairs for each party
    sk1, vk1 = generate_key_pair()
    sk2, vk2 = generate_key_pair()
    sk3, vk3 = generate_key_pair()
    
    # Share public keys with each other
    vk_list = [vk1, vk2, vk3]
    
    # Generate a joint signature from all parties
    message = "Hello, world!"
    signature = joint_sign(sk1, vk_list, message)
    
    # Verify the joint signature
    valid = joint_verify(vk_list, message, signature)
    print("Signature is valid:", valid)

    In this example, key pairs are generated for each party using the generate_key_pair() function. The public keys are shared among the parties by creating a vk_list. Then, a joint signature is generated using the joint_sign() function by providing a private key, the vk_list, and the message to be signed. Finally, the joint signature is verified using the joint_verify() function by providing the vk_list, the message, and the signature.

    Ensure that the ecdsa library is installed before running the code (pip install ecdsa).


    With this documentation, you should have a clear understanding of the provided example and be able to utilize the joint signature scheme with ECC for Secure Multi-Party Computation in your own applications.

    Visit original content creator repository
    https://github.com/xonoxitron/secure-multiparty-computation-sandbox

  • kakoune-gdb

    kakoune-gdb

    kakoune plugin for gdb integration.

    demo

    Setup

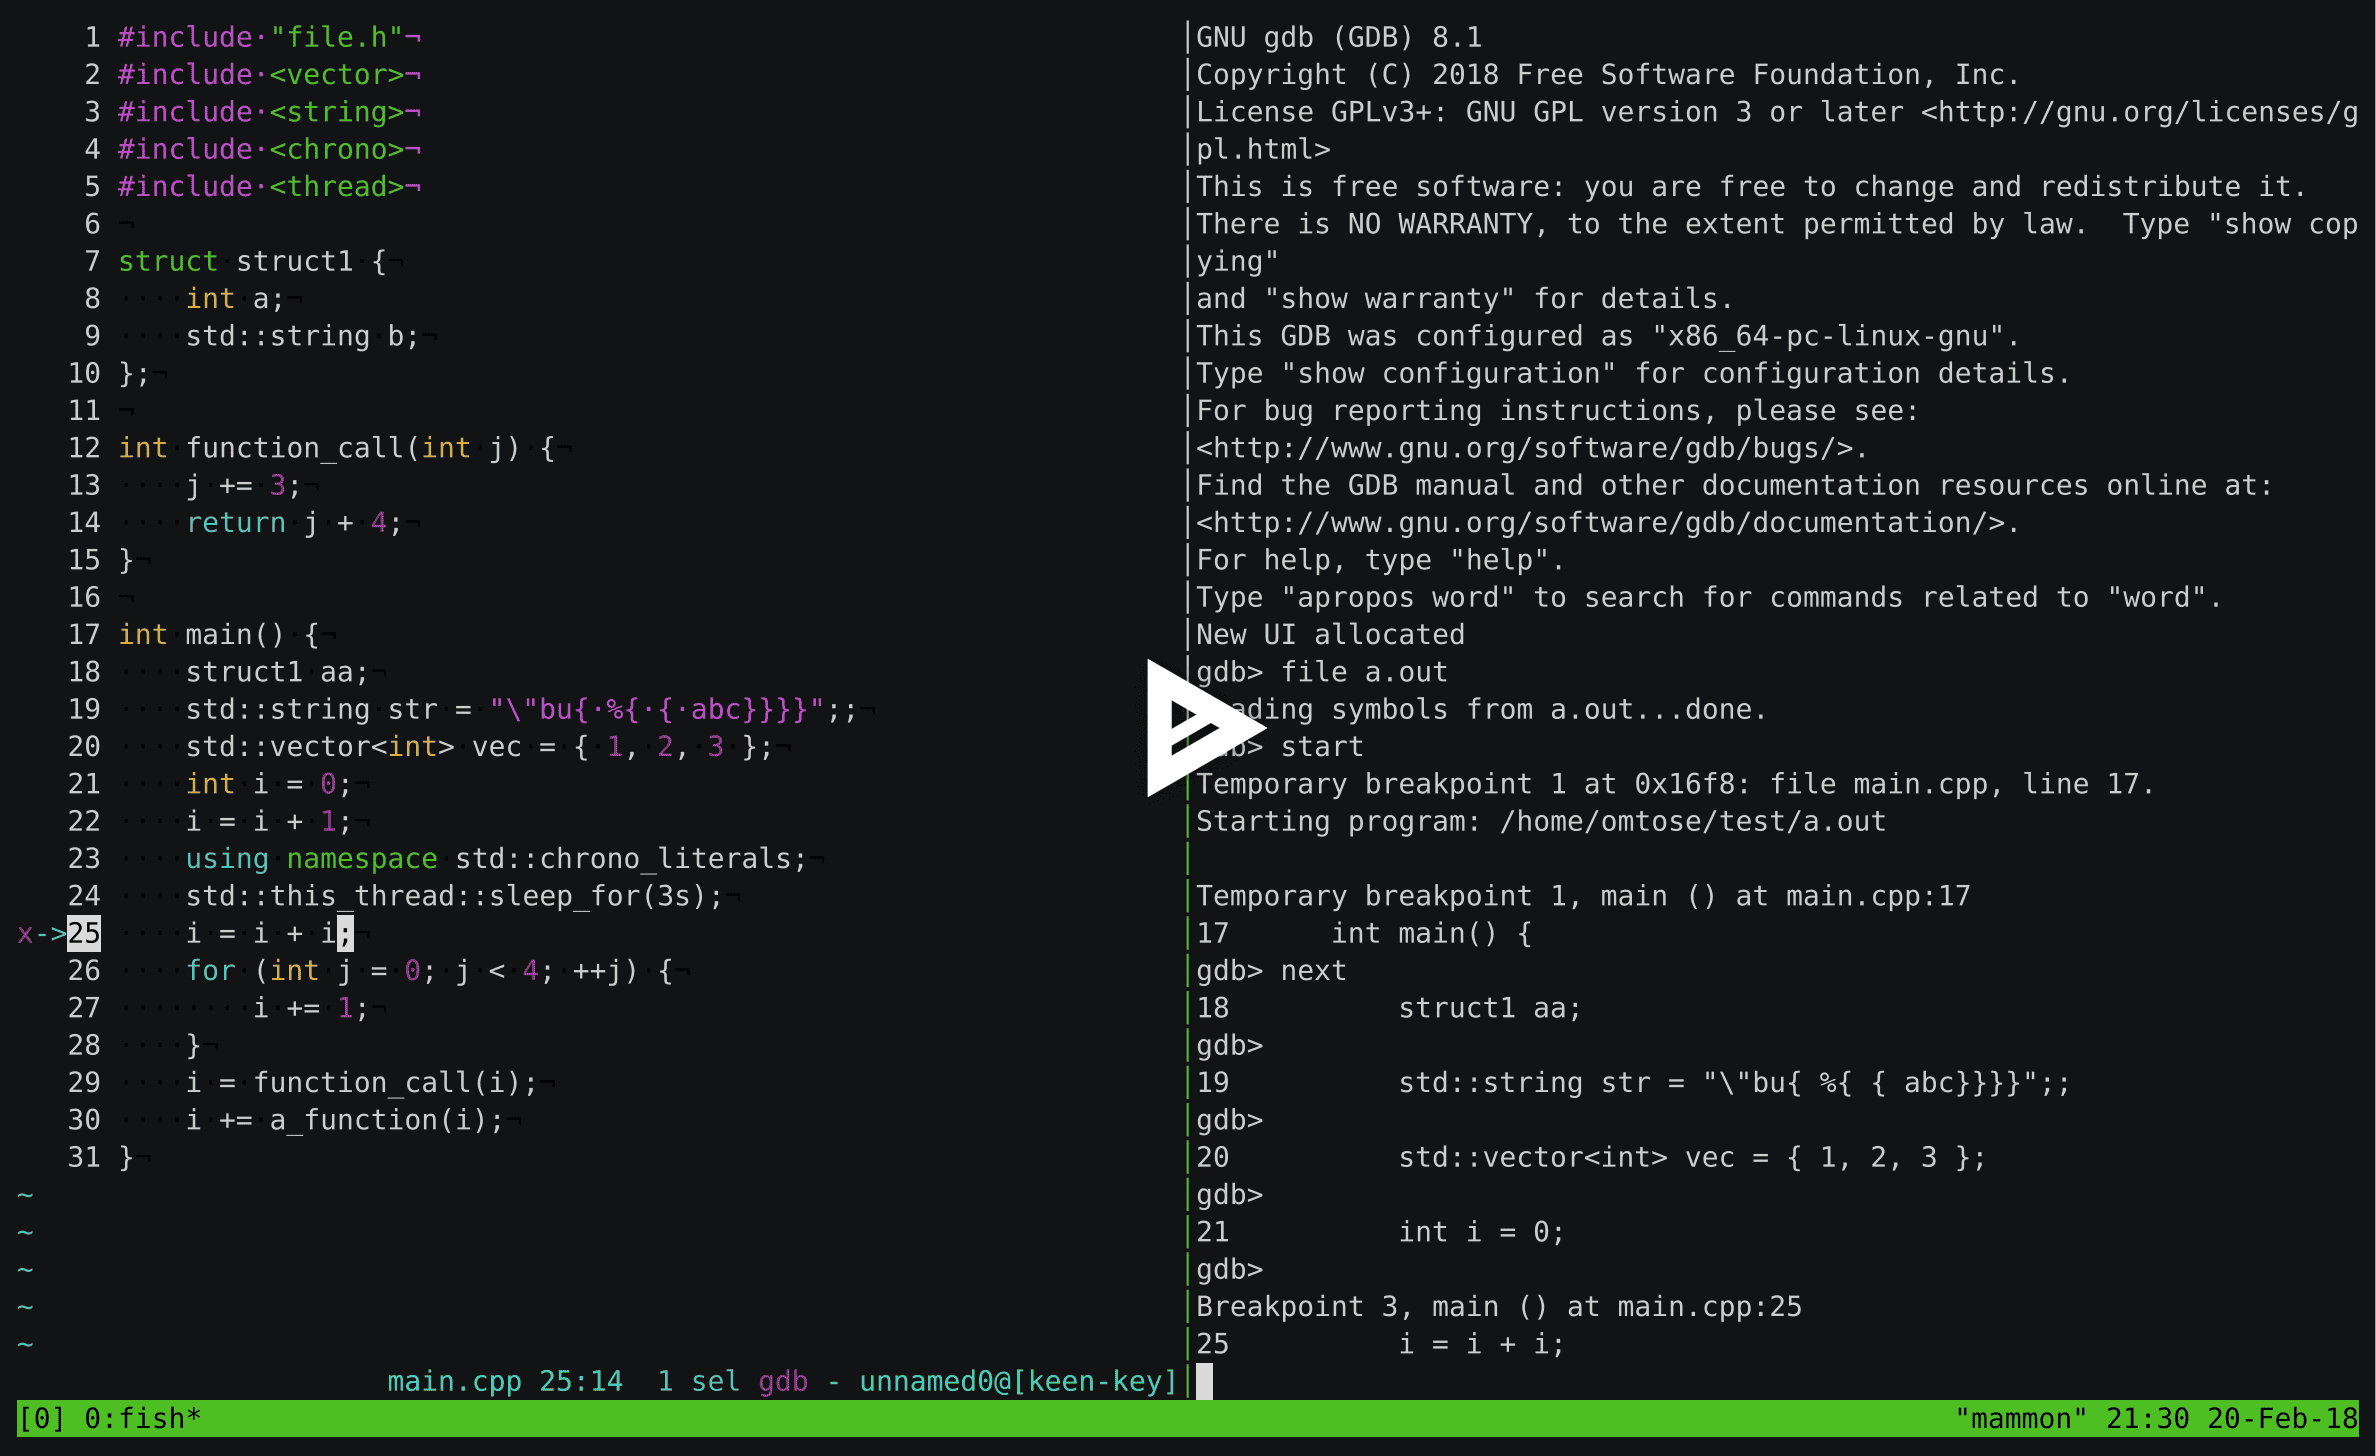
    Add gdb.kak and gdb-output-hanlder.perl to your autoload dir: ~/.config/kak/autoload/, or source it manually. Both files must be in the same directory for the script to work.

    You need at least Kakoune v2019.01.20. In addition, this script has hard dependencies on gdb (>= 7.12), socat, perl as well as the usual POSIX environment. There is also on optional dependency on rr.

    Usage

    Interfacing with gdb

    The first step in using the script is to connect kakoune and gdb together. There are multiple ways to do this, detailed below:

    Starting a gdb session

    If you wish to start a new debugging session, you should call gdb-session-new. A new gdb instance will be started, already connected to kakoune. Any additional command parameters will be passed to gdb (in particular, the executable you wish to debug).

    If you wish to use a different program than gdb (for example a wrapper script like rust-gdb), you can set the gdb_program option.

    Note: this uses the generic terminal command provided by kakoune to create the new terminal window.

    Using rr

    If you use rr, you can call rr-session-new. A new gdb instance will be started with the latest rr recording.

    Connecting to an existing session

    If you already have a running session of gdb but want to make kakoune aware of it, call gdb-session-connect. The infobox will show you a command that you should call in gdb directly. Once that is done, kakoune will be connected to gdb and all pre-existing gdb state will be shown.
    Warning: for this to work properly, the mi-async gdb variable must be set to on BEFORE the debugged program has been started.

    Controlling gdb

    Once kakoune is connected to gdb, gdb can be controlled normally from its REPL or by issuing commands from kakoune’s side.
    Kakoune will then be updated in real-time to show the current state of gdb (current line, breakpoints and whether they are enabled).
    The script provides commands for the most common operations; complex ones should be done in the gdb REPL directly.

    kakoune command gdb equivalent Description
    gdb-run run start the program
    gdb-start start start the program and pause right away
    gdb-step step execute the next line, entering the function if applicable (step in)
    gdb-next next execute the next line of the current function (step over)
    gdb-finish finish continue execution until the end of the current function (step out)
    gdb-continue continue continue execution until the next breakpoint
    gdb-jump-to-location if execution is stopped, jump to the location
    gdb-set-breakpoint break set a breakpoint at the cursor location
    gdb-clear-breakpoint clear remove any breakpoints at the cursor location
    gdb-toggle-breakpoint remove or set a breakpoint at the cursor location
    gdb-print print print the value of the currently selected expression in an infobox (and in the buffer *gdb-print* if it exists)
    gdb-backtrace backtrace show the callstack in a scratch buffer

    The backtrace view can be navigated using <ret> to jump to the selected function.

    The gdb-{enable,disable,toggle}-autojump commands let you control if the current client should jump to the current location when execution is stopped.

    Extending the script

    This script can be extended by defining your own commands. gdb-cmd is provided for that purpose: it simply forwards its arguments to the gdb process. Some of the predefined commands are defined like that:

    define-command gdb-run -params ..    %{ gdb-cmd -exec-run %arg{@} }
    define-command gdb-start -params ..  %{ gdb-cmd -exec-run --start %arg{@} }
    define-command gdb-step              %{ gdb-cmd -exec-step }
    define-command gdb-next              %{ gdb-cmd -exec-next }
    define-command gdb-finish            %{ gdb-cmd -exec-finish }
    define-command gdb-continue          %{ gdb-cmd -exec-continue }
    

    You can also use the existing options to further refine your commands. Some of these are read-only ([R]), some can also be written to ([RW]).

    • gdb_session_started[bool][R] : true if a debugging session has been started
    • gdb_program_running[bool][R]: true if the debugged program is currently running (stopped or not)
    • gdb_program_stopped[bool][R]: true if the debugged program is currently running, and stopped
    • gdb_autojump_client[str][RW]: if autojump is enabled, the name of the client in which the jump is performed
    • gdb_print_client[str][RW] : the name of the client in which the value is printed
    • gdb_location_info[str][R] : if running and stopped, contains the location in the format line file
    • gdb_breakpoints_info[str][R]: contains all known breakpoints in the format id1 enabled1 line1 file1 id2 enabled2 line2 file2

    Customization

    The gutter symbols can be modified by changing the values of these options:

    gdb_breakpoint_active_symbol
    gdb_breakpoint_inactive_symbol
    gdb_location_symbol
    

    as well as their associated faces:

    GdbBreakpoint
    GdbLocation
    

    It is possible to show in the modeline the status of the plugin using the option gdb_indicator. In the demo, I use:

    set global modelinefmt '%val{bufname} %val{cursor_line}:%val{cursor_char_column} {{context_info}} {{mode_info}} {red,default}%opt{gdb_indicator}{default,default}- %val{client}@[%val{session}]'
    

    To setup “standard” debugger shortcuts, you can use the following snippet:

    hook global GlobalSetOption gdb_session_started=true %{
        map global normal <F10>   ': gdb-next<ret>'
        map global normal <F11>   ': gdb-step<ret>'
        map global normal <s-F11> ': gdb-finish<ret>'
        map global normal <F9>    ': gdb-toggle-breakpoint<ret>'
        map global normal <F5>    ': gdb-continue<ret>'
    }
    hook global GlobalSetOption gdb_session_started=false %{
        unmap global normal <F10>   ': gdb-next<ret>'
        unmap global normal <F11>   ': gdb-step<ret>'
        unmap global normal <s-F11> ': gdb-finish<ret>'
        unmap global normal <F9>    ': gdb-toggle-breakpoint<ret>'
        unmap global normal <F5>    ': gdb-continue<ret>'
    }
    

    TODO

    • set temporary/conditional breakpoints
    • handle up/down, and moving the current frame from the backtrace buffer

    Notable changes

    • The gdb_started option was renamed to gdb_session_started

    License

    Unlicense

    Visit original content creator repository https://github.com/occivink/kakoune-gdb
  • brfv4_mac_examples

    Beyond Reality Face SDK – v4.1.0 (BRFv4) – Readme

    What is BRFv4?

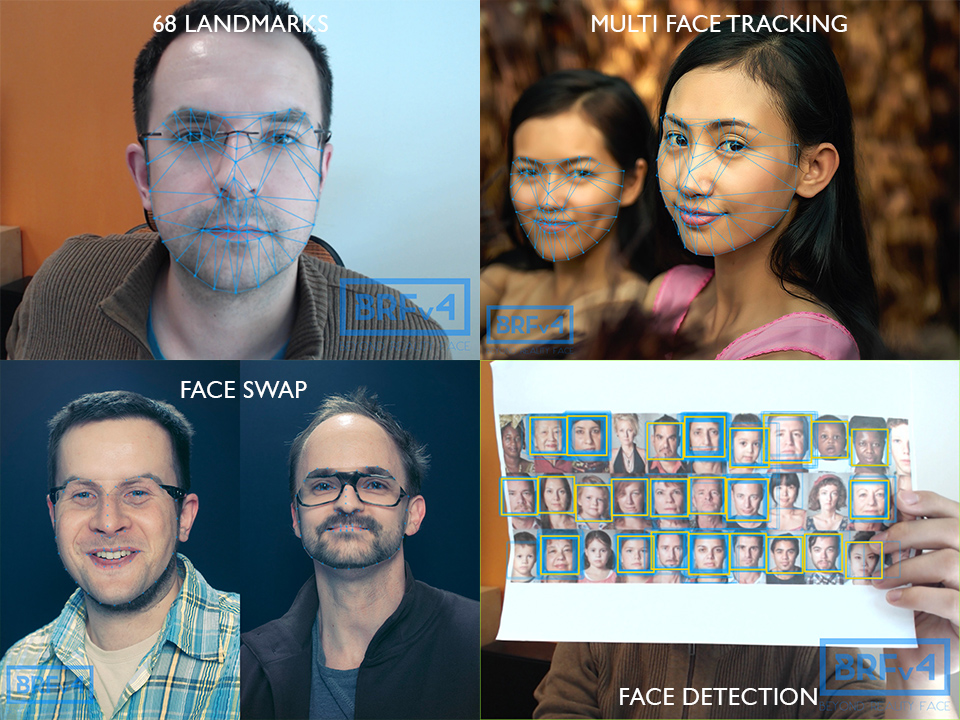
    It is a real time face detection and tracking SDK. You put in image data (camera stream or single picture) and it outputs facial data.

    alt text

    Ready to try!

    Read the EULA (eula.txt) carefully before using the SDK. Once you decide to use BRFv4 commercially, you will get a separate license agreement, that you must agree to. You can try the SDK free of charge to evaluate if it fits your projects’ needs. Once you decided to use BRFv4 in your project, please contact us for a commercial license:

    Visit us online.

    Getting started.

    To test BRFv4 simply visit the Javascript demo site:

    This page also includes all available packages for download.

    Which platforms does it support?

    HTML5/Browser – Javascript (works in Chrome/Firefox/Edge/Opera/Safari 11)

    Run the index.html on a local server.

    iOS – ObjectiveC/C++

    Open the Xcode project. Attach your iOS device and run the example app on your device.

    Android – Java

    Open the Android Studio project. Attach your Android device and run the example app on your device.

    macOS – C++ utilizing OpenCV for camera access and drawing

    Have OpenCV brewed (opencv3) on your system. Open the Xcode project and just run it on your Mac.

    Windows – C++ utilizing OpenCV for camera access and drawing

    Good luck in trying to compile OpenCV for your Windows. Update the Visual Studio (2017) project properties that mention OpenCV. Then run the Release x64 target. Fingers crossed!

    Adobe AIR – Actionscript 3 on Windows, macOS, iOS and Android

    Use your preferred IDE. Add the src folder and the ANE itself to your class path and run the example class on your desired device (not in a simulator). Unfortunately we had to discontinue Flash Player (SWF in browser) support.

    Technical overview

    BRFv4 comes with the following components:

    • face detection – Finds faces (rectangles) in an image/camera stream
    • face tracking – Finds 68 facial landmarks/features
    • point tracking – Tracks points in a webcam stream

    All available packages have roughly the same content and come with a set of examples to show SDK use cases.

    What image size does BRFv4 need?

    You can input any image size.

    Internally BRFv4 uses a DYNx480 (landscape) or 480xDYN (portrait) image for the analysis. So 480px is the base size that every other input size gets scaled to, eg.

    landscape:

    • 640 x 480 -> 640 x 480 // fastest, no scaling
    • 1280 x 720 -> 854 x 480
    • 1920 x 1080 -> 854 x 480

    portrait:

    • 480 x 640 -> 480 x 640 // fastest, no scaling
    • 720 x 1280 -> 480 x 854
    • 1080 x 1920 -> 480 x 854

    BRFv4 scales the results up again, so you don’t have to do that yourself. All parameters named *size or *width are pixel values based on the actual image size. eg. telling BRF what face sizes to initially detect:

    brfManager.setFaceDetectionParams(int minFaceSize, int maxFaceSize, int stepSize, int minMergeNeighbors);

    If you work with a 640×480 camera stream, it would be something like this:

    brfManager.setFaceDetectionParams(144, 432, 12, 8);

    Where as if you work with a 1280×720 camera stream, you will need something like this:

    brfManager.setFaceDetectionParams(216, 648, 12, 8);

    In the examples we generalize that a bit:

    // We have either a landscape area (desktop), then choose height or
    // we have a portrait area (mobile), then choose width as max face size.
    
    var maxFaceSize = _faceDetectionRoi.height;
    
    if(_faceDetectionRoi.width < _faceDetectionRoi.height) {
     maxFaceSize = _faceDetectionRoi.width;
    }
    
    brfManager.setFaceDetectionParams(maxFaceSize * 0.30, maxFaceSize * 0.90, 12, 8);

    More on that in the API, see link above.

    FAQ

    Can I track other objects like hands or neck?

    • No, it is tracking faces only.

    Can you increase the performance?

    • We could remove some calculations in a commercial version, if you want to, but this comes at the price of reduced accuracy.

    Can you make the library smaller?

    • Usually the descriptor would be 80MB and more. It’s already only 9MB for most platforms. So: We could go down in 1,5MB steps, but this will also massively accuracy. Once you bought a license you can choose which size you want to go with.

    Release notes

    v4.1.0 – 11th July 2018

    • All: Changed 3D calculation model a bit. This might result in slightly different placement and rotationX.
    • Info: We started to work on BRFv5 (yeha!)

    v4.0.1 – 09th November 2017

    • JS: Added: WASM export to Javascript SDK.
    • JS: Fix: Found a workaround for iOS 11 (in Safari) for starting the camera.
    • JS: Updated: CreateJS to v1.0.2 (easel) and v1.0.1 (preload).
    • JS: Updated: ThreeJS to r88.
    • Minor cleanups
    • Known issue: JS SDK is slow in Chrome 63 because of this bug: https://bugs.chromium.org/p/chromium/issues/detail?id=768775

    v4.0.0 – 20th June 2017

    It’s done! After over a year of development Tastenkunst is proud to announce the release of BRFv4.

    • Changed: Completely rewritten the C++ core: image handling, face detection and tracking algorithms etc.
    • Changed: Image data can now be of any site. BRFv4 will handle the scaling internally.
    • Changed: Point tracking and face tracking can now be done simultaneously.
    • Changed: Face tracking algorithm changed from ASM to ERT. This comes with an increased file size though (For JS up from 2MB to 10MB)
    • Added: Multi face tracking. It is now possible to track more than one face.
    • Added: Example project for native Android (Java, Android Studio project)
    • Added: Example project for macOS (C++, Xcode project, needs brewed OpenCV for camera handling and drawing)
    • Added: Example project for Windows (C++, Visual Studio 2017 project, needs OpenCV for camera handling and drawing)
    • Added: Adobe AIR native extension now supports Windows, macOS, iOS and Android.
    • Removed: Support for Flash Player (SWF in Browser).

    Licenses

    Used Haar Cascade: haarcascade_frontalface_default.xml

    <!-- Stump-based 24x24 discrete(?) adaboost frontal face detector. Created by Rainer Lienhart. //////////////////////////////////////////////////////////////////////////////////////// IMPORTANT: READ BEFORE DOWNLOADING, COPYING, INSTALLING OR USING. By downloading, copying, installing or using the software you agree to this license. If you do not agree to this license, do not download, install, copy or use the software. Intel License Agreement For Open Source Computer Vision Library Copyright (C) 2000, Intel Corporation, all rights reserved. Third party copyrights are property of their respective owners. Redistribution and use in source and binary forms, with or without modification, are permitted provided that the following conditions are met: * Redistribution's of source code must retain the above copyright notice, this list of conditions and the following disclaimer. * Redistribution's in binary form must reproduce the above copyright notice, this list of conditions and the following disclaimer in the documentation and/or other materials provided with the distribution. * The name of Intel Corporation may not be used to endorse or promote products derived from this software without specific prior written permission. This software is provided by the copyright holders and contributors "as is" and any express or implied warranties, including, but not limited to, the implied warranties of merchantability and fitness for a particular purpose are disclaimed. In no event shall the Intel Corporation or contributors be liable for any direct, indirect, incidental, special, exemplary, or consequential damages (including, but not limited to, procurement of substitute goods or services; loss of use, data, or profits; or business interruption) however caused and on any theory of liability, whether in contract, strict liability, or tort (including negligence or otherwise) arising in any way out of the use of this software, even if advised of the possibility of such damage. -->
    Visit original content creator repository https://github.com/Tastenkunst/brfv4_mac_examples
  • dragoman

    Dragoman

    Build Status Coverage Status

    an interpreter (of sorts)

    Provides a facade which allows the user to …

    • Query datasets, applying projections and predicates to filter and shape the datasets to meet the user’s needs
    • Subscribe for updates, listen to changes in datasets

    The datasets are, broadly speaking, of two types:

    • Local: these are stored within Dragoman
    • Remote: these are read, on demand, from a remote source over HTTP

    Although this app is functional it is primarily a sandbox, a place for trying out technologies. Bearing that caveat in mind, feel free to dig deeper …

    Building Dragoman

    To build Dragoman locally:

    $ git clone https://github.com/glytching/dragoman.git
    $ cd dragoman
    $ mvn clean package
    

    This will compile and run all automated tests and create the application distributable.

    Note: the Java code is formatted using the Google Code Formatter.

    Running Dragoman

    Runtime Parameters

    The following JVM parameters will change aspects of Dragoman’s behaviour:

    • env controls the set of properties to be chosen from application.properties. The default environment runs against a local MongoDB server and is accessible on a well known HTTP port. The alternative environment is named embedded, in this mode the application spins up an embedded MongoDB instance nd makes itself available on a randomly selected port from the free port range. In this mode the application is entirely self contained, it makes no assumptions about the host it is running on.
    • log.dir controls how logs are written. When this parameter is supplied all log output is written to file and these files are stored in the address supplied by this parameter. When this parameter is not supplied all log output is written to console.

    Running In-IDE

    Just run the Dragoman class, it has a main method.

    Running As A Standalone Process

    The application distributable is an uber JAR, it contains the application’s class files and resources alongside the application’s dependencies. When run in embedded mode the application will start an in-process instance of MongoDB. When run in non embedded mode the application will expect to find a Mongo instance at the address defined in the application.properties (specifically the mongo.host and mongo.port properties).

    To run the uber JAR:

    In Embedded Mode, Logging To Console
    $ java -Denv=embedded -jar target/dragoman-1.0-SNAPSHOT-uber.jar
    
    In Embedded Mode, Logging To File
    $ java -Denv=embedded -Dlog.dir=logs -jar target/dragoman-1.0-SNAPSHOT-uber.jar
    
    In Non Embedded Mode, Logging To Console
    $ java -jar target/dragoman-1.0-SNAPSHOT-uber.jar
    

    Using the Webapp

    When the server is running the web application will be available at:

    http://<host>:<port>/dragoman/about.hbs

    Where:

    • <host> is the host on which the server is running
    • <port> is defined by the http.port value in application.properties. By default, this is 31000 but if the server is running in embedded mode then this port will be assigned from the free port range. To see what port has been assigned look for a log message like this: o.g.dragoman.web.WebServerVerticle|Starting HTTP server on port: .... Note: when running in embedded mode the startup routine will attempt to launch a browser on the dynamically assigned HTTP port so you shouldn’t have to trawl the logs for the HTTP port.
    Browser Compatibility

    The web app has been tested and verified for the following browsers:

    • Safari 9.x
    • Firefox 51.0
    • Chrome 61.x

    License

    Licensed under the Apache License, Version 2.0 (the "License");
    you may not use this file except in compliance with the License.
    
    You may obtain a copy of the License at
    
       http://www.apache.org/licenses/LICENSE-2.0
    
    Unless required by applicable law or agreed to in writing, software
    distributed under the License is distributed on an "AS IS" BASIS,
    WITHOUT WARRANTIES OR CONDITIONS OF ANY KIND, either express or implied.
    See the License for the specific language governing permissions and
    limitations under the License.
    
    Visit original content creator repository https://github.com/glytching/dragoman
  • meetapp

    demo of the app

    📃 about

    meetapp is a service to help you organize events

    with meetapp, you register “talks” with a certain time in minutes, and based on those minutes and their categories, an algorithm organizes your event for you

    the goal is to try to make the event as less segmented as possible, always trying to organize lectures on different types of subjects and not just a specific type

    try to use the app now

    🎨 layout

    i built all this application UI with figma, you can find the design here

    📌 features

    organize your event

    the algorithm organizes your event into trails automatically, based on the duration of your meets

    keep track of your trails

    easily see all the trails of your event, and when each meet will happen

    🔨 how it was built

    this project was developed with the following technologies:

    🔌 how to use

    to clone this repository and run this app, you’ll need git and node.js installed on your computer.

    i highly recommend yarn for handling node packages faster, but you can use npm if you want, no problem.

    from your command line:

    # clone this repository
    $ git clone https://github.com/emkis/meetapp.git
    
    # go into the repository
    $ cd meetapp
    
    # install dependencies
    $ npm install
    
    # run the app in development mode
    $ npm run start

    ✌️ say hello to me on linkedin or send me and email 📫

    Visit original content creator repository https://github.com/emkis/meetapp
  • Phonebook-Management-System

    Phonebook-Management-System

    Phonebook management system in C is a console application without graphics.

    About Phonebook Management System 🚀 :

    This simple mini project in C creates an external file to store the user’s data permanently to perform file handling operations. Phonebook is an extremely straightforward small undertaking in C that can assist you with understanding the fundamental ideas of capacities, record taking care of, and information structure. This application will show you how to include, list, change or alter, look and erase information to/from the record.
    Individual data like name, gender, father’s name, contact number, postal code, email, and address are asked while including a record into the Phonebook. These records would be able to be altered, recorded, looked for, and eliminated.
    We have used many functions in this project. These functions are very easy to understand as their name itself signifies their respective operations.

    Open in Gitpod

    Functions that are used in this project:

    1. void add_contact(): ——-> It’s a utility function to add a contact into the directory
    2. void search_contact(): ——-> It’s a utility function to search for a contact
    3. void modify_contact(): ——-> It’s a utility function to modify a contact
    4. void display(): ——-> It’s a utility function to display all contacts within the directory
    5. int directory_info(): ——-> It’s a utility function to find out the total no.of contacts in the directory
    6. void display_by_tag(): ——-> It’s a utility function to display all the contacts with the specified tag
    7. int tag_info(): ——-> It’s a utility function to find out the total no.of contacts that are saved in specified tag
    8. void delete_contact(): ——-> It’s a utility function to delete a contact from the directory

    AddContact():

    Source Code :

    void add_contact()
    {
        system("cls");
        FILE *fptr;
        contact cn;
        fptr = fopen("PhoneBook","a");
    
        printf("\n<Fill details>\n");
    
        printf("Enter First Name : ");
        scanf("%s", &cn.fname);
    
        printf("Enter last Name : ");
        scanf("%s", &cn.lname);
    
        printf("\nEnter Mobile Number : ");
        scanf("%s", &cn.mobile_no);
    
        printf("\nEnter Tag(Enter 'Other' for nothing) : ");
        scanf("%s", &cn.tag);
    
        fwrite(&cn, sizeof(contact), 1, fptr);
    
        fclose(fptr);
    
        printf("Enter any key to continue.");
    	getch();
        system("cls");
    }

    SearchContact():

    Source Code :

    void search_contact(){
    	system("cls");
    	FILE *fp;
    	contact cn;
    	int c,flag=0;
    	fp=fopen("PhoneBook","r");
    	if(fp==NULL){
    		printf("\nError in opening\n");
    		exit(1);
    	}
    	printf("\n------------------------------------\n");
    	printf("***SEARCH MENU***\n");
    	printf("----------------------------------------\n");
    	printf("1. Search by name\n2. Search by Phone number\n");
    	printf("Enter your choice : ");
    	scanf("%d",&c);
    	fflush(stdin);
    	if(c==1){
    	char fname[30],lname[30];		
    	printf("Enter the name to be searched for:\n");
    	printf("Enter first name : ");
    	scanf("%s",&fname);
    	printf("Enter last name : ");
    	scanf("%s",&lname);
    	fflush(stdin);
    	while(fread(&cn,sizeof(cn),1,fp)==1){
    		
    		if(strcmp(strlwr(cn.fname),strlwr(fname))==0&&strcmp(strlwr(cn.lname),strlwr(lname))==0){
    			flag=1;
    			printf("\nDetail information about %s\n",fname);
    			printf("---------------------------------------------------------------------\n");
                printf("\n|%-15s%-15s%-20s%-12s|\n", "First Name", "Last Name", "Contact Number", "Tag");
                printf("---------------------------------------------------------------------");
                printf("\n|%-15s%-15s%-20s%-12s|\n",  cn.fname, cn.lname, cn.mobile_no, cn.tag);
    			break;
    			}
    		}
    		if(flag==0){
    		printf("\nSearch not found\n");
    		fclose(fp);}
    	}
    	else if(c==2){
    		char phone[10];
    		printf("Enter phone number to search: ");
    		scanf("%s",&phone);
    		while(fread(&cn,sizeof(cn),1,fp)==1){
    			if(strcmp(phone,cn.mobile_no)==0){
    				flag=1;
    				printf("\n\nDetail information about %s",phone);
    				printf("---------------------------------------------------------------------\n");
                    printf("\n|%-15s%-15s%-20s%-12s|\n", "First Name", "Last Name", "Contact Number", "Tag");
                    printf("---------------------------------------------------------------------");
                    printf("\n|%-15s%-15s%-20s%-12s|\n",  cn.fname, cn.lname, cn.mobile_no, cn.tag);
    			    break;
    			}
    		}
    		if(flag==0) {
    		printf("\nSearch not found\n");
    		fclose(fp);
    		}
    	}
    	else{
    		printf("Wrong Choice!!");
    		fclose(fp);
    	}
    	printf("Enter any key to continue:");
    	getch();
    	system("cls");
    }

    ModifyContact():

    Source Code :

    void modify_contact()
    {
        system("cls");
        FILE *fptr, *fptr1;
        contact cn;
        char fname[15];
        char lname[15];
        char modify;
        int found = 0;
    
        fptr = fopen("PhoneBook", "r");
        fptr1 = fopen("helper", "w");
    
        printf("Enter the name of Contact to modify:\n");
    	printf("Enter First name: ");
    	scanf("%s",&fname);
    	printf("Enter Last name: ");
    	scanf("%s",&lname);
    	fflush(stdin);
    
    	while(fread(&cn,sizeof(contact),1,fptr))
        {
            if(strcmp(strlwr(cn.fname),strlwr(fname))==0&&strcmp(strlwr(cn.lname),strlwr(lname))==0)
            {
                found = 1;
                printf("\nModify First Name?<y/n> : ");
                scanf("%c", &modify);
                fflush(stdin);
                if(modify == 'y' || modify == 'Y')
                {
                    printf("Enter New First name : ");
                    scanf("%s", &cn.fname);
                    fflush(stdin);
                }
                printf("\nModify Last Name?<y/n> : ");
                scanf("%c", &modify);
                fflush(stdin);
                if(modify == 'y' || modify == 'Y')
                {
                    printf("Enter New Last name : ");
                    scanf("%s", &cn.lname);
                    fflush(stdin);
                }
                printf("\nModify Mobile Number? <y/n> : ");
                scanf("%c", &modify);
                fflush(stdin);
                if(modify == 'y' || modify == 'Y')
                {
                    printf("Enter New Mobile Number : ");
                    scanf("%s", &cn.mobile_no);
                    fflush(stdin);
                }
                printf("\nModify Tag? <y/n> : ");
                scanf("%c", &modify);
                fflush(stdin);
                if(modify == 'y' || modify == 'Y')
                {
                    printf("Enter New Tag : ");
                    scanf("%s", &cn.tag);
                    fflush(stdin);
                }
            }
            fwrite(&cn, sizeof(contact), 1, fptr1);
        }
        fclose(fptr);
        fclose(fptr1);
    
        if(found == 1)
        {
            fptr1 = fopen("helper", "r");
            fptr = fopen("PhoneBook", "w");
    
            while(fread(&cn, sizeof(contact), 1, fptr1))
                fwrite(&cn, sizeof(contact), 1, fptr);
    
            printf("\nContact Modified Successfully\n");
        }
        else
            printf("Contact not found");
    
        fclose(fptr);
        fclose(fptr1);
    
        printf("\n\nEnter any key to continue : ");
    	getch();
        system("cls");
    }

    Display():

    Source Code :

    void display()
    {
        system("cls");
        FILE *fptr;
        contact cn;
        int mode, count = 1, i, n;
        fptr = fopen("PhoneBook", "r");
    
        printf("1 : View by Time Created (Ascending)\n");
        printf("2 : View by Time Created (Descending)\n");
        printf("Choose Display Mode : ");
        scanf("%d", &mode);
        n = directory_info();
        printf("---------------------------------------------------------------------\n");
        printf("|Total Number of contacts : %2d                                      |\n", n);
        printf("---------------------------------------------------------------------");
        printf("\n|%-3s| %-15s%-15s%-20s%-12s|\n", "Sno", "First Name", "Last Name", "Contact Number", "Tag");
        printf("---------------------------------------------------------------------");
    
        if(mode == 1)
        {
            while(fread(&cn, sizeof(contact), 1, fptr))
            {
                printf("\n|%-3d| %-15s%-15s%-20s%-12s|", count++, cn.fname, cn.lname, cn.mobile_no, cn.tag);
            }
        }
    
        else if (mode == 2)
        {
            fseek(fptr,-(sizeof(cn)), SEEK_END);
    
            for(i = 1; i <= n; ++i)
            {
                fread(&cn, sizeof(contact), 1, fptr);
                printf("\n|%-3d| %-15s%-15s%-20s%-12s|", count++, cn.fname, cn.lname, cn.mobile_no, cn.tag);
                fseek(fptr, -2*sizeof(contact), SEEK_CUR);
            }
        }
    
        else
            printf("\n|Invalid Selection !!!                                       |");
    
        printf("\n---------------------------------------------------------------------\n");
    
        fclose(fptr);
    
        printf("\n\nEnter any key to continue : ");
    	getch();
        system("cls");
    }

    DirectoryInfo():

    Source Code :

    int directory_info(){
       FILE *fptr;
    
       fptr = fopen("PhoneBook", "r");
       fseek(fptr, 0, SEEK_END);
    
       return ftell(fptr)/sizeof(contact);
    }

    DisplayByTag():

    Source Code :

    void display_by_tag()
    {
        system("cls");
        char tag[20];
        FILE *fptr;
        contact cn;
        int count=1, n;
        fptr = fopen("PhoneBook", "r");
        fflush(stdin);
        printf("Enter Tag : ");
        scanf("%s", tag);
        n = tag_info(tag);
        printf("---------------------------------------------------------------------\n");
        printf("|Total Number of contacts : %2d                                      |\n", n);
        printf("---------------------------------------------------------------------");
        printf("\n|%-3s| %-15s%-15s%-20s%-12s|\n", "Sno", "First Name", "Last Name", "Contact Number", "Tag");
        printf("---------------------------------------------------------------------");
    
        while(fread(&cn, sizeof(contact), 1, fptr))
        {
            if(strcmp(strlwr(cn.tag), strlwr(tag)) == 0)
                printf("\n|%-3d| %-15s%-15s%-20s%-12s|", count++, cn.fname, cn.lname, cn.mobile_no, cn.tag);
        }
    
        printf("\n---------------------------------------------------------------------\n");
    
        fclose(fptr);
        fflush(stdin);
        printf("\n\nEnter any key to continue : ");
    	getch();
        system("cls");
    }

    TagInfo():

    Source Code :

    int tag_info(char tag[])
    {
        int num = 0;
        FILE *fptr;
        contact cn;
        fptr = fopen("PhoneBook", "r");
    
        while(fread(&cn, sizeof(contact), 1, fptr))
        {
            if(strcmp(strlwr(cn.tag), strlwr(tag)) == 0)
                num++;
        }
        return num;
    }

    DeleteContact():

    Source Code :

    void delete_contact(){
    	contact cn;
    	FILE *fptr,*fptr1;
    	int flag;
    	system("cls");
    	fptr=fopen("PhoneBook","r");
    	if(fptr==NULL){
    		printf("CONTACT'S DATA NOT ADDED YET");
    	}
    	else{
    		fptr1=fopen("helper","w+");
    		if(fptr1==NULL)printf("Error in opening the file");
    		else{
    			
    			int choice;
    			printf("\n----------------------------------------");
    			printf("\n***DELETION MENU***\n");
    			printf("----------------------------------------\n");
    			printf("1.Deletion through mobile number\n2.Deletion through name\n");
    			printf("Enter your choice: ");
    			scanf("%d",&choice);
    			if(choice==1){
    				char mobile_no[25];
    				printf("Enter CONTACT's mobile_no:");
    				scanf("%s",&mobile_no);
    				fflush(stdin);
    				while(fread(&cn,sizeof(cn),1,fptr)==1){
    					if(strcmp(mobile_no,cn.mobile_no)!=0){
    						fwrite(&cn,sizeof(cn),1,fptr1);
    					}
    					if(strcmp(mobile_no,cn.mobile_no)==0){
    						flag=1;
    					}
    				}
    			}
    			else if(choice==2){
    			char fname[25],lname[25];
    			printf("Enter CONTACT's fname: ");
    			scanf("%s",&fname);
    			printf("Enter CONTACT's lname: ");
    			scanf("%s",&lname);
    			fflush(stdin);
    			while(fread(&cn,sizeof(cn),1,fptr)==1){
    				if(strcmp(strlwr(cn.fname),strlwr(fname))!=0||strcmp(strlwr(cn.lname),strlwr(lname))!=0){
    					fwrite(&cn,sizeof(cn),1,fptr1);
    				}
    				if(strcmp(strlwr(cn.fname),strlwr(fname))==0&&strcmp(strlwr(cn.lname),strlwr(lname))==0){
    					flag=1;
    				}
    			}
    		}else{
    			printf("\nWrong choice!\nEnter any key to continue");
    			getch();
    			system("cls");
    		}
    		
    			fclose(fptr);
    			fclose(fptr1);
    			if(flag!=1){
    				printf("NO CONTACT'S RECORD TO DELETE!\n");
    			}
    			else{
    				fptr1 = fopen("helper", "r");
    				fptr = fopen("PhoneBook", "w");
    				while(fread(&cn, sizeof(contact), 1, fptr1))
    					fwrite(&cn, sizeof(contact), 1, fptr);
    				printf("\nContact Deleted Successfully\n");
    				
    			}
    			fclose(fptr1);
    			fclose(fptr);
    		}
    	}
    	printf("Enter any key:");
    	getch();
    	system("cls");
    }
    Visit original content creator repository https://github.com/Kranthi-Guribilli/Phonebook-Management-System
  • botanalytics-unofficial

    botanalytics middleware for Botkit

    A middleware package for Botkit that easily logs your convos in BotAnalytics.co

    Currently only supports Slack right now.

    Install

    npm install botanalytics-middleware --save

    Usage

    It’s really simple!

    First, in your bot.js file, include this module and initialize it with your botanalytics token.

    var botanalytics = require('botanalytics')(TOKEN).slack;
    

    Second, add the following code, usually right after initializing the Botkit controller.

    controller.middleware.receive.use(botanalytics.receive);
    controller.middleware.send.use(botanalytics.send);
    

    Lastly, ensure your initial controller.spawn code looks something like this:

    controller.spawn(teams[t]).startRTM(function(err, bot, res) {
      if (err) {
        console.log('Error connecting bot to Slack:',err);
      } else {
        botanalytics.connect(res);
        trackBot(bot);
      }
    });
    

    Note that the startRTM callback returns a res parameter, and before trackBot is called, you make the call to botanalytics.connect, passing in the res object.

    Disclaimer

    All mention of botanalytics and its use in this project are copyright of botanalytics at http://botanalytics.co

    I do not work for botanalytics nor does botanalytics endorse this project in any way. I’m just a chatbot developer who needs analytics on my bots.

    License

    MIT License

    Copyright (c) 2016 Alex Sopinka

    Permission is hereby granted, free of charge, to any person obtaining a copy
    of this software and associated documentation files (the “Software”), to deal
    in the Software without restriction, including without limitation the rights
    to use, copy, modify, merge, publish, distribute, sublicense, and/or sell
    copies of the Software, and to permit persons to whom the Software is
    furnished to do so, subject to the following conditions:

    The above copyright notice and this permission notice shall be included in all
    copies or substantial portions of the Software.

    THE SOFTWARE IS PROVIDED “AS IS”, WITHOUT WARRANTY OF ANY KIND, EXPRESS OR
    IMPLIED, INCLUDING BUT NOT LIMITED TO THE WARRANTIES OF MERCHANTABILITY,
    FITNESS FOR A PARTICULAR PURPOSE AND NONINFRINGEMENT. IN NO EVENT SHALL THE
    AUTHORS OR COPYRIGHT HOLDERS BE LIABLE FOR ANY CLAIM, DAMAGES OR OTHER
    LIABILITY, WHETHER IN AN ACTION OF CONTRACT, TORT OR OTHERWISE, ARISING FROM,
    OUT OF OR IN CONNECTION WITH THE SOFTWARE OR THE USE OR OTHER DEALINGS IN THE
    SOFTWARE.

    Visit original content creator repository
    https://github.com/asopinka/botanalytics-unofficial