Author: 779rd5fmjvci

  • xkeditor

    XK-Editor

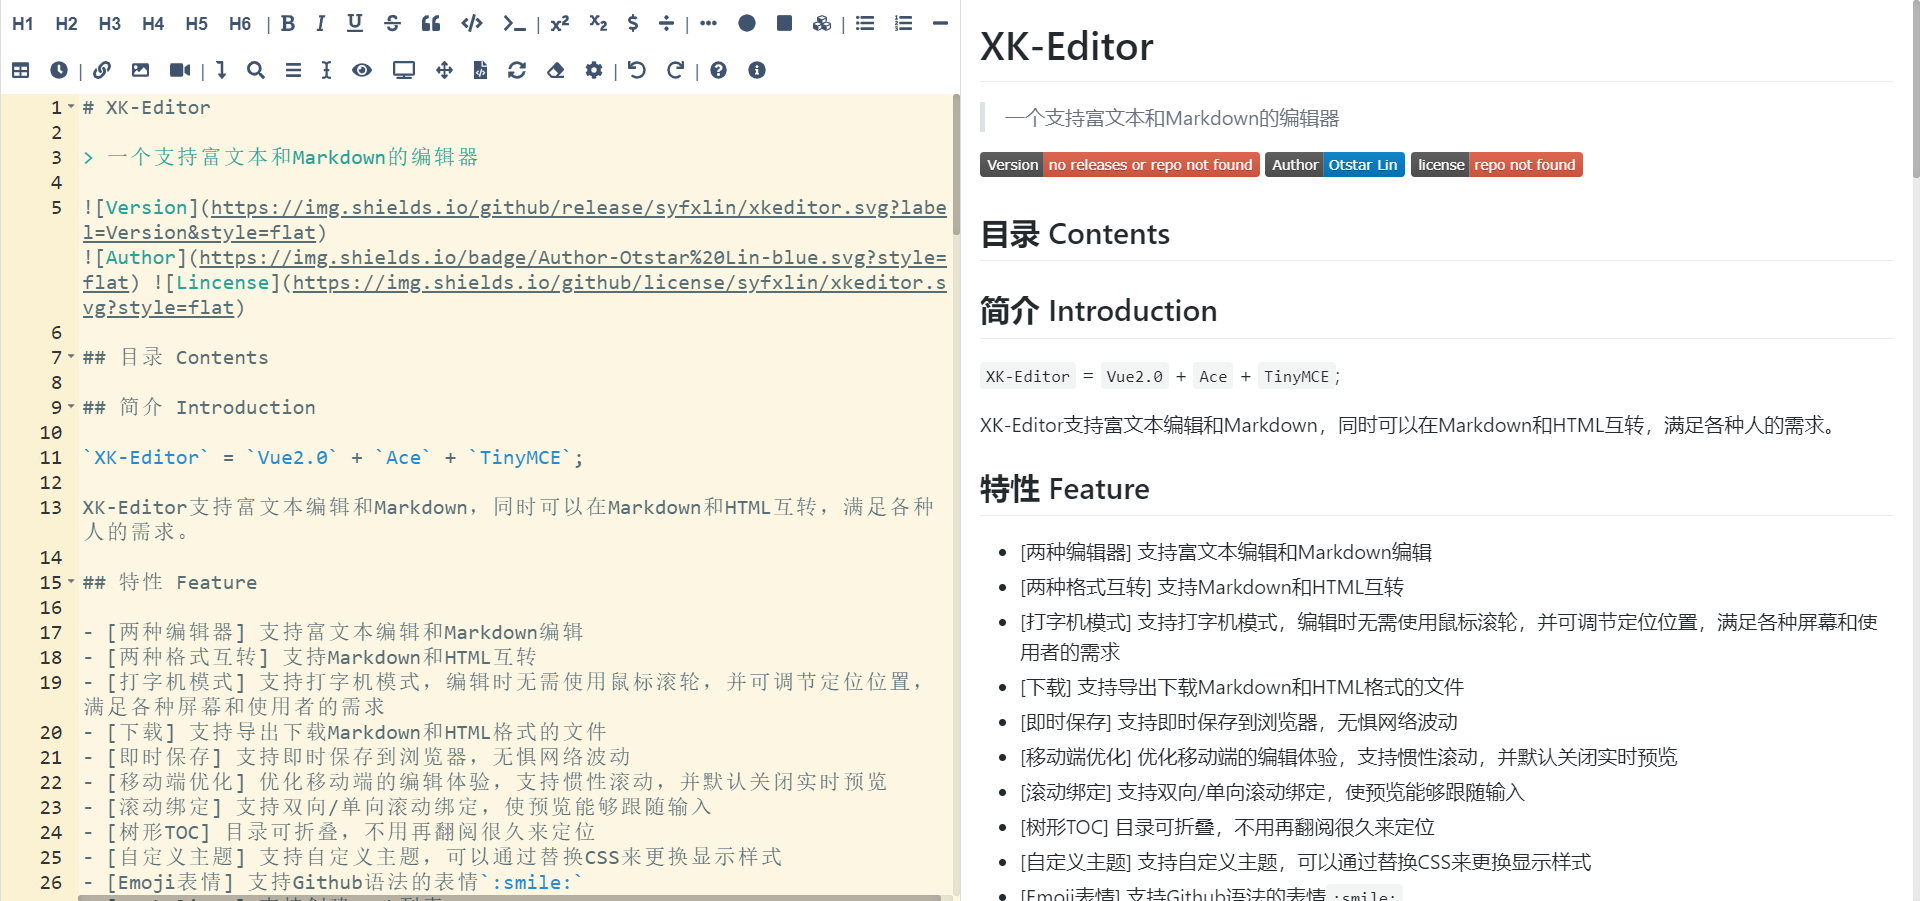
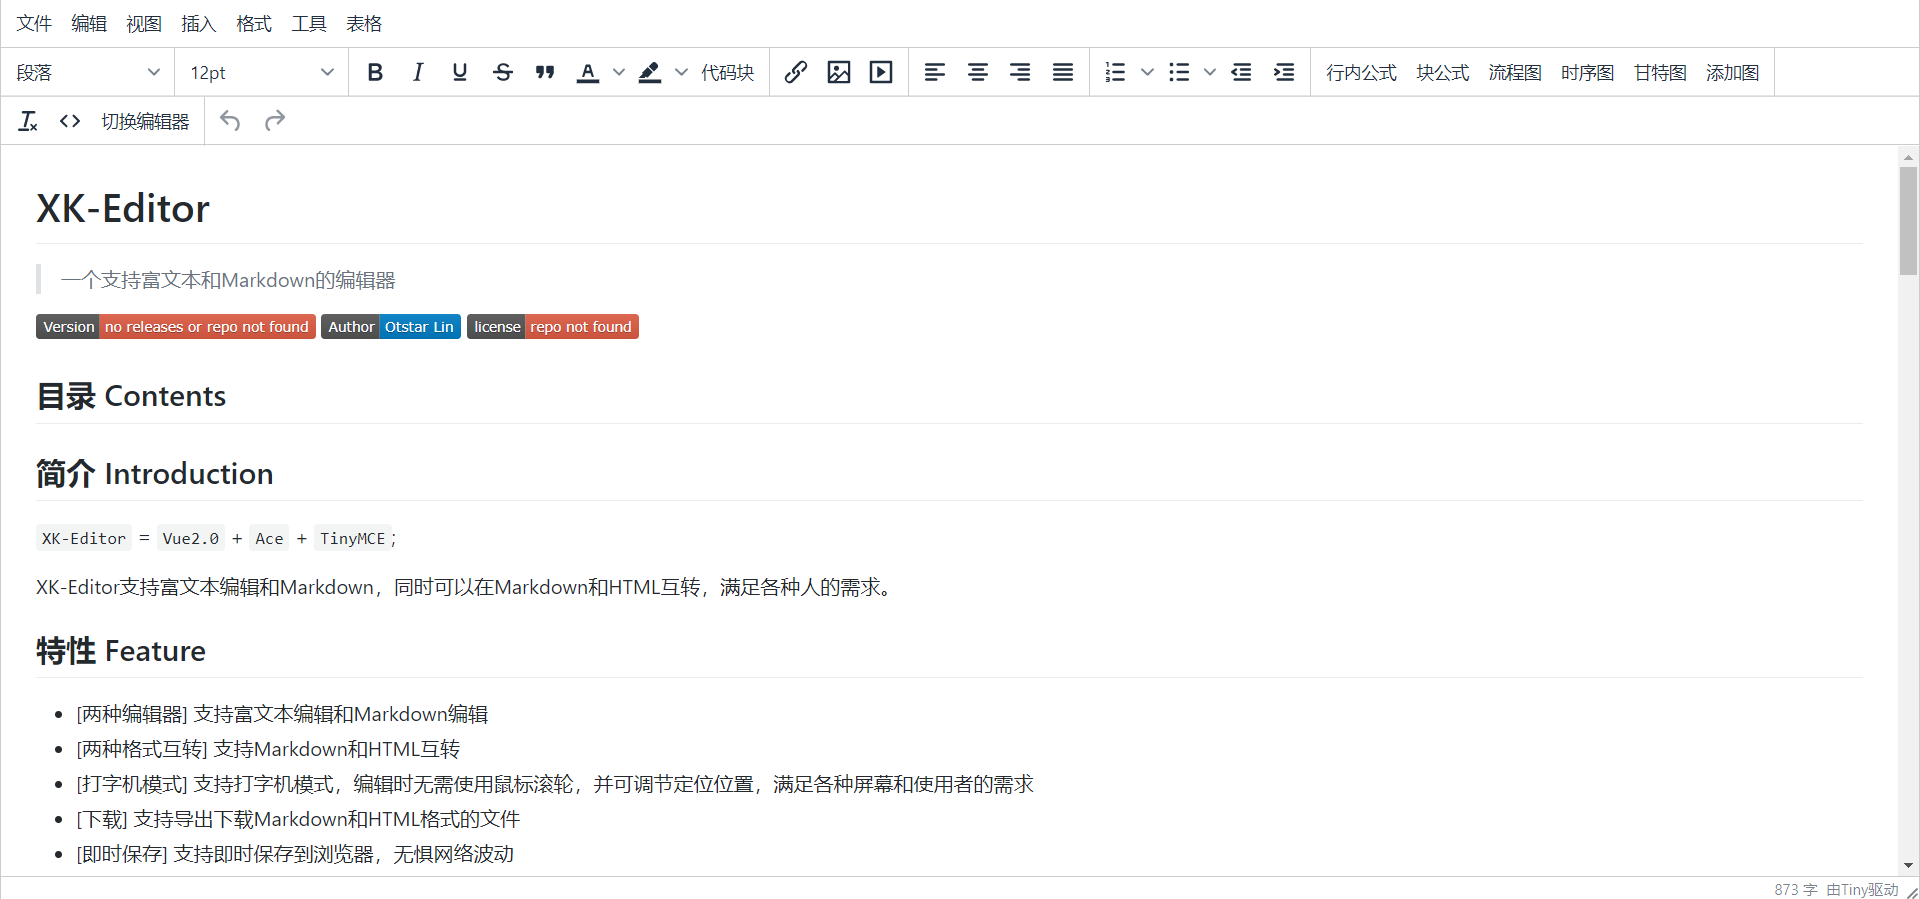
    一个支持富文本和 Markdown 的编辑器

    XK-Editor v2 已经开始开发,由于是从头写起的(为了适应新的编辑器,重写会好一点),所以与 v1 不兼容,v1 将在不久后停止维护。 v2 版本采用了类似于 Typora 的所见即所得的模式,同时也支持分栏的模式。

    Version Npm-Latest Author Lincense Build Status

    目录 Contents

    简介 Introduction

    XK-Editor = Vue2.0 + Ace + TinyMCE;

    XK-Editor 支持富文本编辑和 Markdown ,同时可以在 Markdown 和 HTML 互转,满足各种人的需求。

    特性 Feature

    • [两种编辑器] 支持富文本编辑和 Markdown 编辑
    • [两种格式互转] 支持 Markdown 和 HTML 互转
    • [打字机模式] 支持打字机模式,编辑时无需使用鼠标滚轮,并可调节定位位置,满足各种屏幕和使用者的需求
    • [粘贴自动格式化] 支持在粘贴 HTML 时自动将 HTML 格式化为 Markdown
    • [图片粘贴自动上传] 支持粘贴图片自动上传,并自动填充链接
    • [嵌入运行块] 支持嵌入可运行的代码块,通过与后端交互可以支持多种语言
    • [下载] 支持导出下载 Markdown 和 HTML 格式的文件
    • [即时保存] 支持即时保存到浏览器,无惧网络波动
    • [移动端优化] 优化移动端的编辑体验,支持惯性滚动,并默认关闭实时预览
    • [滚动绑定] 支持双向/单向滚动绑定,使预览能够跟随输入
    • [树形 TOC] 目录可折叠,不用再翻阅很久来定位
    • [自定义主题] 支持自定义主题,可以通过替换 CSS 来更换显示样式
    • [Emoji 表情] 支持 Github 语法的表情 :smile:
    • [Task lists] 支持创建 Task 列表
    • [TeX 公式] 支持插入 KaTex 公式
    • [流程图/时序图/甘特图] 支持 mermaid 语法编写各种图
    • [解析 HTML] 支持解析各种 HTML 标签,并支持过滤标签
    • [独有的扩展语法] 拥有一些扩展语法
    • [自动补全] 支持语法自动补全
    • [图片上传] 支持图片上传
    • 还有多种神奇的功能等待你的发掘。

    演示 Demo

    XK-Editor

    安装 Install

    注意事项

    XK-Editor 还在不断的改进中 API 可能会更改

    从 Version 1.0.8 开始,为了减小 Vendor 体积,防止加载时间过长,XK-Editor 默认使用 jsDelivr CDN 加载部分 node_modules 需要在 index.html 中添加以下 script 标签,若您不打算使用该方式加载,请将 node_modules/xkeditor/components 下的文件中所有的 import 注释取消。

    从 Version 1.4.6 开始,模块默认通过 webpack externals 方式导入,所以您需要修改 webpack 的配置文件,添加对应的配置,如下

    module.exports = {
      externals: {
        "ace-builds": "ace",
        marked: "marked",
        turndown: "TurndownService",
        "turndown-plugin-gfm": "turndownPluginGfm",
        prismjs: "Prism",
        "emoji-js": "EmojiConvertor",
        "tinymce/tinymce": "tinyMCE",
        mermaid: "mermaid",
        katex: "katex",
        "katex/dist/contrib/auto-render": "renderMathInElement"
      }
    };

    从 NPM 安装

    你可以轻松将 XK-Editor 引入你现有的项目

    1. 安装 XK-Editor
    npm i --save xkeditor
    1. 将 XK-Editor static 文件复制到项目根目录
    cp -r ./node_modules/xkeditor/public/static ./
    1. 导入 XK-Editor 组件
    import XK_Editor from "xkeditor";
    export default {
      components: {
        "xk-editor": XK_Editor
      }
    };
    1. 使用 XK-Editor 组件
    var config = {
      // 该设置为 TinyMCE 的设置,详情见 TinyMCE 编辑器的文档
      tinymceSetting: {
        language_url: "/static/tinymce/langs/zh_CN.js",
        language: "zh_CN",
        skin_url: "/static/tinymce/skins/ui/oxide",
        body_class: "markdown-body",
        content_css: "/static/github-markdown.css",
        plugins:
          "print preview fullpage searchreplace autolink directionality code visualblocks visualchars fullscreen image link media template codesample table charmap hr pagebreak nonbreaking anchor toc insertdatetime advlist lists wordcount imagetools textpattern",
        toolbar:
          "formatselect | fontsizeselect | bold italic underline strikethrough blockquote forecolor backcolor prismjs | link image media pageembed | alignleft aligncenter alignright alignjustify | numlist bullist outdent indent | tex-$ tex-math flow seq gantt mermaid | removeformat code toMarkdownEditor | undo redo",
        image_advtab: true,
        importcss_append: true,
        height: "100%",
        template_cdate_format: "[CDATE: %m/%d/%Y : %H:%M:%S]",
        template_mdate_format: "[MDATE: %m/%d/%Y : %H:%M:%S]",
        image_caption: true,
        spellchecker_dialog: true,
        spellchecker_whitelist: ["Ephox", "Moxiecode"]
      },
      // 该设置为 ACE 编辑器的设置,详情见 ACE 编辑器文档
      aceSetting: {
        // toolbar 为 XK-Editor 扩展的字段,语法和 tinymce 的 toolbar 字段一致
        toolbar:
          "h1 h2 h3 h4 h5 h6 | bold italic underline strikethrough quote mark code | sup sub tex-$ tex-math | flow seq gantt mermaid | ul ol minus table time | link image video graff | toLine search toc typewriter switchPreview fullPreview fullScreen toHtmlEditor toTinyMCE format empty setting | undo redo | setLocalStorage getLocalStorage removeLocalStorage | help info | pasteFormat",
        minLines: 10,
        fontSize: "17px",
        theme: "ace/theme/solarized_light",
        mode: "ace/mode/markdown",
        tabSize: 4,
        wrap: true,
        enableSnippets: true,
        enableLiveAutocompletion: true,
        enableBasicAutocompletion: true,
        value: "# XK-Editor"
      },
      // XK-Editor 相关设置
      xkSetting: {
        // 暂时无用
        apiBaseUrl: "",
        // 预览的 CSS 文件,类似于主题
        previewCss: "/static/github-markdown.css",
        // 预览的 class
        previewClass: "markdown-body",
        // 延迟渲染时间 (ms),由于性能因素 XK-Editor 限制该选项不能低于 500ms
        delayToHtml: 500,
        // 滚动绑定,(left,right,both)
        scrollBind: "both",
        // 图片上传的地址
        imgUpload: "http://example.com/upload.php",
        // 滚动模式,默认使用 JavaScript 的方式来滚动,防止与 Hash Router 冲突
        scrollMode: "javascript",
        // 粘贴格式化
        pasteFormat: true,
        // 粘贴自动上传(仅对复制图像时有效,混合内容无效,需要设置图片上传地址)
        pasteImageUpload: true,
        // 是否开启 TinyMCE 编辑器
        enableTinyMCE: true,
        // run-code 的地址
        judge0API: "https://example.com",
        // run-code 语言列表
        runCodeLangList: {
          c: 1,
          cpp: 2,
          bash: 3,
          csharp: 4,
          go: 5,
          java: 6,
          node: 7,
          php: 8,
          python: 9,
          python2: 10,
          ruby: 11,
          rust: 12,
          scala: 13,
          typescript: 14
        }
      }
    };
    var data = {
      graff: {
        // SVG Hash
        "6b3117":
          // viewBox|SVG innerHTML
          '8.399999618530273 9 423.9984436035156 154|<path d="M 290.4,100 L 293.4,104 L 304.4,112 L 326.4,123 L 345.4,131 L 360.4,136 L 378.4,140 L 395.4,145 L 405.4,148 L 415.4,152 L 420.4,152 L 421.4,153 L 422.4,153" fill="none" stroke="#6190e8" stroke-width="2"></path><rect x="18.4" y="19" fill="none" stroke="#6190e8" stroke-width="2" width="131" height="69" d="M 18.4 19 h 131 v 69 h -131 Z"></rect>'
      }
    }

    运行代码块

    运行代码块除 javascript 不需要使用后端,其他语言都需要有后端负责执行代码。 后端执行器基于 judge0/api 重新 build 而来,支持的语言详见 run-code ,若您有其他语言的需求,您可以自行参照教程重新 build

    run-code

    文档 Doc

    Wiki

    维护者 Maintainer

    XK-Editor 由 Otstar Lin 和下列 贡献者 的帮助下撰写和维护。

    Otstar Lin – Personal Website · Blog · Github

    许可证 License

    lincense

    根据 Apache License 2.0 许可证开源。

    渲染 Render

    xkeditor01.png xkeditor02.png

    Visit original content creator repository https://github.com/syfxlin/xkeditor
  • taylor_robot

    Taylor-Robot

    Taylor is a differential robot built using ROS2.

    ros2_control

    ros2_control package is used to control the two wheels. The Arduino Nano is used as a hardware component that receives a command from controllers and converts it to a PWM signal for the H bridge, through the Arduino Nano the controllers can read/write to these interfaces.

    It is the Raspberry Pi B+ that runs the controllers, which compares the reference value with the measurement output from the encoders and calculates the system’s input based on this error (for more details, visit Control Theory).

    Nav2

    The Nav2 package allows mobile robots to move safely from one location to another. Using sensors, this package performs mapping, localization, and perception functions. In addition to collecting information about the environment, these sensors can be used to build and maintain a map of the environment, to pinpoint the robot on the map, and to avoid obstacles that may be encountered in that environment.

    LIDAR (RPLIDAR A1) and encoders from the wheels are used as sensors for this project, so Taylor can navigate on his own in a mapped world using Nav2.

    Nav2 simulation using Gazebo and Rviz

    Our Future 🚀

    This project seeks to provide the groundwork for a more enthusiastic robot—an autonomous mobile robot (AMR)—and to develop a functioning prototype of it. Even though Taylor is already an AMR, we still want more! In future Taylor versions, we’ll construct an AMR that can be utilized in a manufacturing environment.

    AMRs pick, transport, and sort things without human interaction in production and distribution operations. They are highly desired because of their numerous benefits, which include preventing product damage, lowering labor expenses, increasing productivity, and automating procedures. AMRs are already benefiting several industries, including transportation, logistics, automotive, and food.

    Visit original content creator repository https://github.com/mateus-mos/taylor_robot
  • ESP32-BMS

    ESP32-BMS

    Single ESP32 monitoring and balancing multiple cell Li-Ion battery.

    For each cell, to enable discharging, the ESP32 drives an opto-coupler (P521) with the digital output and the opto-coupler is driving the discharge mosfet(IRFZ44N) /resistor(16ohm,3W) across each cell. This’ll be duplicatable across any number of cells (given the ESP32 has enough analog inputs and digital outputs. I’m using it for a 4 cell BMS/monitor which is using Adafruit io for trending/remote monitoring. The RJ11 port is to connect it to an Inverter. This is NOW coded in. I wasn’t able to test the newer design with my old Kisae Inverter but the circuit in my original BMS worked fine (The single Arduino with a ESP8266-01 BMS).

    Note: I added an I2C port to easily allow for adding components (like maybe an LCD/OLED display).

    Ordered PCB and succesfully tested it (before I added the mounting holes and the wider traces.) Worked great (didn’t test i2c or rj11 port.)

    My Kisae SW1220 inverter died in a lightning strike, but if you have one I think the schematic/board need to be changed to have Battery+ going to the optocoupler and the other leg going to the RJ11 port. (The wires on the opto-coupler will have to be reversed of course.)

    My replacement inverter, a Go-Power GP-SW2000-12, has a remote input (Gnd, Enab, !Enab). I was able to use the schematic/board as is and simply connect the !Enab input on the inverter directly to the opto-coupler connection at the RJ11 port. (Which gets grounded when the digital output from the ESP32 turns on.)

    Note: The Kisae inverter used a momentary Battery+ signal to turn the inverter on or off (change it from one state to the other). The Go Power inverter requires a constant input signal (either battery+ or Gnd depending on the input you use) in order to be powered on. (Enab requires Batt+, !Enab requires Gnd, pick one to use.) The current code works with the Go Power Inverter.

    Visit original content creator repository
    https://github.com/willburk97/ESP32-BMS

  • offsec-tools

    Syslifters OffSec Tools

    This repository is intended for pentesters and red teamers using a variety of offensive security tools during their assessments. The repository is a collection of useful tools suitable for assessments in internal environments. We fetch and compile the latest version of each tool on a regular basis and provide it to you as a release.

    You don’t have to worry about updating and compiling the tools yourself. Just download the latest release and find all the awesome tools you will need in a single archive.

    Happy Hacking! 🙂
    Team Syslifters 🦖
    https://syslifters.com

    🔎 P.S. looking for a proper pentest reporting tool?

    Demo

    🚀 Have a look at SysReptor

    Tools included

    FAQ

    Why do you do that?

    Many OffSec tools are shipped with their source code only and therefore need to be compiled manually. This is a very time-consuming task, especially if you want to keep your tools up to date before doing assessments. Better save the time for more important things, right?

    Duhh, but you also put PowerShell scripts in releases. Why?

    We don’t want to rack our brains every time before an assessment about which tools we need. A release conveniently contains all the tools we need for the assessment as a collection. Noice!!

    Did you backdoor the tools?

    No. Cross our heart and hope to die.

    Nah, still don’t trust you guys. Can’t we build it ourselves?

    Oh man, we don’t blame you. It’s the lot of the security industry. But if you’re motivated, you can also create your own build pipeline. We’d be happy to show you how to do that. Instructions and our gitlab-ci.yml are included in this repository.

    Which version of the tools do you use?

    When creating a release, we use the latest version from the official repository of the respective tool. You can check the version in the commit message, which points to the latest commit in the official repository.

    How often do you plan to create a release?

    We have fully automated the steps required to create a release using a build pipeline. We therefore plan to create a release once a week.

    I am missing an awesome tool, what should I do?

    Just let us know! Open an issue with a link to the repository you want to add. We’ll have a look and add it if it’s a reasonable fit.

    Visit original content creator repository https://github.com/Syslifters/offsec-tools
  • natsuki-ggproject

    Natsuki Discord bot

    Natsuki is a discord bot of GG project and dedicated firstly for GG project
    Some modules need to rewrite to work with configs and be adaptive for any bot

    GG project info

    The project is dedicated to creating unique servers on the Internet. Of course, all servers can be unique, but we try to make them as unique and interesting as possible.

    Features

    • Read and reply DM
    • Simple command handler
    • Embed generator
    • Privileges (need to rewrite)
    • Read modules/list.lua to know all features

    TODO

    • New privileges system
    • Votes for GG Events
    • Automatic check reviews of GG Project
    • Rewrite voice module for any stream and playing music
    • Archive of appelas of GG project
    • Command to give clan roles for clan owners of GG project
    • Write all servers where bot is
    • Translation to other languages

    Install and config

    Install and launch

      $ git clone https://github.com/GG-Project/natsuki.git
      $ cd natsuki/
      $ luvit natsuki.lua

    Dependencies

    To launch bot you need discordia library, that works on luvit. Just follow instructions on discordia repository, how to install it

    Configs

    Before launch bot, create config.json in home folder and config token for it:

    {
      "token": "Token of your discord bot",
      "example_backend_url": "http://127.0.0.1:1080/api/"
    }

    Other configs in that config.json requires with some modules

    To disable some modules you need to comment lines in modules/list.lua

    Configs, that allows to use some modules:

    Configs Config description Allowed modules
    backend_url, backend_token Use backend admin, privileges, accounts_link
    qiwi_hook_id Qiwi donate notifier. DEPRECATED qiwidonat
    economy_smile, economy_curse_in Economy valute emoji and curse. DEPRECATED economy
    donation_channel_id Notify to specified channel id about donate. DEPRECATED money

    Privileges

    groups.lua config for admin module:

    groups = {
      ['discord_user_id'] = 'owner',
      ['other_discord_user_id'] = 'admin'
    }

    Backend

    To work with backend, you need to config and launch backend server from this repository

    Config

    Just create config.json with following configs:

    {
      "listen_port": "backend server port",
      "tokens": ["backend token 1", "backend token 2", "and more tokens"],
      "privilege_servers": ["server_name_1", "server_name_2"],
      "mysql_db_host": "database_remote_ip",
      "mysql_db_port": 3306,
      "mysql_db_user": "database_user",
      "mysql_db_password": "database_user_password",
      "mysql_db_name": "database_name"
    }

    Launch

      $ cd backend/
      $ luvit http.lua

    License

    GNU General Public License v3.0

    Visit original content creator repository
    https://github.com/Workbench-Team/natsuki-ggproject

  • Geno4SD

    Geno4SD

    CI Build GitHub Pages

    Geno4SD is an omics data toolkit for the analysis of omics data across biological scales, from single-cell analysis to large patient cohorts, and over multiple modalities, including genomics, transcriptomics, clinical medical data, and patient demographics. Within this toolkit are analytic methods that span phylogenetics, epidemilogy, topological data analysis, and ML/AL frameworks for omics scale data.

    Geno4SD provides access to individual tools as well as detailed use cases for analyses that demonstrate how multiple methodologies can be leveraged together.

    Geno4SD

    Analytic tools included in Geno4SD

    1. ReVeaL: Rare Variant Learning is a stochastic regularization-based learning algorithm. It partitions the genome into non-overlapping, possibly non-contiguous, windows (w) and then aggregates samples into possibly overlapping subsets, using subsampling with replacement (stochastic), giving units called shingles that are utilized by a statistical learning algorithm. Each shingle captures a distribution of the mutational load (the number of mutations in the window w of a given sample), and the first four moments are used as an approximation of the distribution.

      ReVeaL tutorial can be found here: tutorial

    2. LSM: Lesion Shedding Model can order lesions from the highest to the lowest ctDNA shedding for a given patient from cfDNA liquid and lesion biopsies. Our framework intrinsically models for missing/hidden lesions and operates on blood and lesion cfDNA assays to estimate the potential relative shedding levels of lesions into the blood. By characterizing the lesion-specific cfDNA shedding levels, we can better understand the mechanisms of shedding as well as more accurately contextualize and interpret cfDNA assays to improve their clinical impact.

      LSM tutorial can be found here: tutorial

    3. CuNA: Cumulant-based Network Analysis is a toolkit for integrating and analyzing multi-omics data which finds higher-order relationships from multi-omic data with EHR information across different thresholds of statistical significance. CuNA provides two components:

      1. A network with nodes representing multi-omics variables and edges reflecting their stre ngth in higher-order interactions.

      2. A risk score, CuRES, which is a holistic view of risk or liability of a target trait or disease, per individual.

      CuNA tutorial can be found here: tutorial

      CuNAviz, the visualization tool for CuNA can be found here:

      1. CuNAviz for Parkinson’s Disease
      2. CuNAviz for Breast Cancer, scenario I
      3. CuNAviz for Breast Cancer, scenario II
      4. CuNAviz for Breast Cancer, scenario III
      5. CuNAviz for Breast Cancer, scenario IV
    4. RubricOE: a rubric for omics epidemiology is a cross-validated machine learning framework with feature ranking described and multiple levels of cross validation to obtain interpretable genetic and non-genetic features from multi-omics data combined.

      RubricOE tutorial can be found here: tutorial

    5. StatGen: Statistical Genetics toolkit is a toolkit for performing quality control on imputed genotype data, computing principal component analysis (using TeraPCA) and thereafter, genome-wide association studies (using PLINK)

      StatGen tutorial can be found here: tutorial

    6. MaSk-LMM: Matrix Sketching-based Linear Mixed Models is a method to compute linear mixed models which are widely used to perform genome-wide association studies on large biobank-scale genotype data using advances in randomized numerical linear algebra.

      MaSk-LMM tutorial can be found here: tutorial

    7. Delta: Significantly associates patients without a known mechanism of resistance to those with one to suggest alterative treatment options based on the known MoR through an analysis of the changes in alterations between timepoints.

    Installation and Tutorials

    In our detailed Online Documentation you’ll find:

    Visit original content creator repository https://github.com/BiomedSciAI/Geno4SD
  • Bioengineering.pl_Internship

    Graduation internship report attachments (HD-SEMG system ADS1298)

    Thiss folder includes: Hardware files, software files, python application, MATLAB and report, design was to build a protable and wireless HD-SEMG aquisition system for my graduation internship of my electrical engineering degree at Hogeschool Rotterdam, the internship took place at bio-engineering.pl Sp.z o (www.bioengineering.pl) in Wroclaw Poland.

    The hypothesis of the project was ”Can the AMAC performance be improved in direct controlled (DC) myoelectric systems, by exactly locating the location where the patient has the most amount of controll over the agonist and antagonist of the residual limb during different hand gestures’’. The goal was to develop a device that can be used to confirm this hypothesis, the could be achieved by measuring the muscle potentials over the residual limb during different hand gestures (HD-SEMG recording)

    In the project multiple AFE were designed were presented (based on AD8232 adn INA333), the function of the AFE to amplify and filter the EMG signal. THe EMG channels were digitezed using the ADS1298. The ADC register data is read from the ADS1298 via an Arduino DUE (SAM3X8E)/ STM32F4. A PC application was developed to visualize the data and verifiy certain system specification (CMRR, IRN and Gain). The Current design is capable of measuring up to 1kSps with the Arduino DUE and to >4kSps with the STM32F411, the problem with the STM32F4 is the the Python application and realterm cannot open the USB port (CDC) to read the data, but it can be open in Tera term. If anybody knows why I would be happy to know 🙂

    If you would like to continue this project Idea, feel to contact me for more info about the future improvements or any other questions about the design of the project.

    Contact details

    If you have any questions about the project feel free to contact me at: okersten@gmail.com

    Visit original content creator repository
    https://github.com/oliverkersten/Bioengineering.pl_Internship

  • Phinx

    Phinx

    Chat on Discord Follow on Bluesky Reddit Hugging Face

    A High-Performance AI Inference Library for ONNX and Phi-4

    Phinx is an advanced AI inference library that leverages ONNX Runtime GenAI and the Phi-4 Multimodal ONNX model for fast, efficient, and scalable AI applications. Designed for developers seeking seamless integration of generative and multimodal AI, Phinx offers an optimized and flexible runtime environment with robust performance.

    🚀 Key Features

    • ONNX-Powered Inference – Efficient execution of Phi-4 models using ONNX Runtime GenAI.
    • Multimodal AI – Supports text, image, and multi-input inference for diverse AI tasks.
    • Optimized Performance – Accelerated inference leveraging ONNX optimizations for speed and efficiency.
    • Developer-Friendly API – Simple yet powerful APIs for easy integration into Delphi, Python, and other platforms.
    • Self-Contained & Virtualized – The Phinx.model file acts as a virtual folder, bundling Phi-4 ONNX model files and all dependencies into a single, portable format.

    Phinx is ideal for AI research, creative applications, and production-ready generative AI solutions. Whether you’re building chatbots, AI-powered content generation tools, or multimodal assistants, Phinx delivers the speed and flexibility you need!

    📂 Phinx Model File Format (Phinx.model)

    The Phinx.model format is a specialized file structure for storing ONNX-based machine learning models, optimized for CUDA-powered inference. It encapsulates all essential components, ensuring seamless model execution.

    🔹 Key Benefits

    1. Self-Contained & Virtualized

      • Acts as a virtual folder within the application.
      • Bundles Phi-4 ONNX model files and dependencies for portability.
    2. Optimized for CUDA Inference

      • Designed for GPU acceleration, delivering high-performance AI execution.
      • Ensures fast loading and efficient CUDA computations.
    3. Structured & Extensible

      • Stores model weights, metadata, configuration parameters, and dependencies in a well-organized manner.
      • Future-proof design allows for additional configurations and optimizations.
    4. Simplified Deployment

      • All required files are consolidated into a single .model file.
      • Eliminates external dependency management for plug-and-play usability.

    🛠 Getting Started

    🔧 System Requirements

    • GPU Requirements: CUDA-compatible NVIDIA GPU with 8–12GB VRAM.
    • Storage Requirements: At least 7GB of free disk space.

    📥 Download Model

    Get the Phinx Model from Hugging Face: 📂 Download Phinx Model

    🏗 Setup Instructions

    1. Place the downloaded model in your preferred directory.
      • Example path: C:/LLM/PHINX/repo
    2. Ensure you have a Delphi version that supports Win64 and Unicode.
    3. Developed with: Delphi 12.2
    4. Tested on: Windows 11 (24H2)
    5. Refer to UTestbed.pas for usage notes and check the examples.

    🚧 Project Status

    ⚠️ Note: This repository is currently in the setup phase. While documentation is being prepared, the code is fully functional and stable. Stay tuned—this README and additional resources will be updated soon! 🚀

    📺 Media

    🌊 Deep Dive Podcast
    Discover in-depth discussions and insights about Sophora and its innovative features. 🚀✨

    🎥 Phinx Feature Videos
    Explore videos showcasing the powerful capabilities of the Phinx library, including tutorials, demonstrations, and real-world applications. 🎬🔥

    phinx001.mp4
    phinx002.mp4
    phinx003.mp4

    💬 Support and Resources

    🤝 Contributing

    Contributions to ✨ Phinx are highly encouraged! 🌟
    Ways to contribute:

    • 🐛 Report Bugs: Help us improve by submitting issues.
    • 💡 Suggest Features: Share ideas to enhance Phinx.
    • 🔧 Create Pull Requests: Improve the library’s capabilities.

    🏆 Contributors

    📜 License

    Phinx is distributed under the BSD-3-Clause License, allowing redistribution and use in both source and binary forms, with or without modification.
    See the 📜 LICENSE for more details.

    💖 Support & Sponsorship

    If you find Phinx useful, please consider sponsoring this project. Your support helps sustain development, improve features, and keep the project thriving.

    Other ways to contribute:

    • Star the repo – It helps increase visibility.
    • 📢 Spread the word – Share Phinx with your network.
    • 🐛 Report bugs – Help identify issues.
    • 🔧 Submit fixes – Found a bug? Fix it and contribute!
    • 💡 Suggest enhancements – Share ideas for improvements.

    Every contribution, big or small, helps make Phinx better. Thank you for your support! 🚀


    ⚡ Phinx – Powering AI with Phi-4, ONNX & CUDA, Seamlessly and Efficiently! ⚡

    Delphi

    Made with ❤️ in Delphi
    Visit original content creator repository https://github.com/tinyBigGAMES/Phinx
  • Smart-Dust-Bin-Project

    IoT BinSight: Revolutionizing Smart Waste Management

    Technologies: Node MCU, C++, IoT Sensors

    Project Overview

    Introducing IoT BinSight, an ingenious solution that redefines waste management through cutting-edge technology. By harnessing the capabilities of Node MCU, C++, and IoT sensors, we have developed an intelligent and efficient Smart Dustbin system that seamlessly addresses waste segregation, automatic lid operation, touchless interaction, and cloud-based data management.

    Key Features

    • Waste Segregation: IoT BinSight effortlessly segregates wet and dry waste, contributing to sustainable waste management practices.

    • Automated Lid Operation: The dustbin’s lid operates automatically, ensuring hassle-free waste disposal.

    • Touch-less Interaction: Embracing modern hygiene norms, IoT BinSight offers touch-less operation for a seamless user experience.

    • Intelligent Fill Monitoring: The system intelligently monitors the fill level of the dustbin, promptly alerting the Waste Collection Authority when the bin is nearly full.

    • Cloud-Connected Data: Relevant data, including fill levels and operational statistics, is securely stored in the cloud for real-time insights and analysis.

    Achievements

    With the IoT BinSight project, I have achieved the following remarkable milestones:

    1. Smart Waste Revolution: By combining innovative hardware and software, IoT BinSight contributes to transforming waste management practices for a cleaner and more sustainable environment.

    2. Seamless Automation: The integration of Node MCU and IoT sensors showcases the potential of automation and real-time data management in waste disposal.

    3. Data-Driven Insights: Through cloud-connected data storage, IoT BinSight offers a platform for informed decision-making and waste collection optimization.

    IoT BinSight epitomizes the convergence of technology and sustainability, heralding a future where waste management is smarter, more efficient, and environmentally conscious.

    Visit original content creator repository
    https://github.com/kunalgarglibra/Smart-Dust-Bin-Project

  • coronavirus

    Coronavirus Dashboard

    A simple analytics pipeline for SARS-CoV-2, built with Airflow, Spark, Druid and Metabase, powered by Johns Hopkins dataset.

    Live demo: https://coronavirus.nubase.tk

    Usage

    First, we need to start all services (this may take a while for the images to build for the first time). Be sure to increase memory available to docker (6GB should be enough).

    $ docker-compose up

    Then we can go to Airflow UI at http://localhost:8080 and monitor coronavirus DAG:

    Airflow-UI

    Once the DAG is complete, we can see our dashboard here http://localhost:

    Metabase dashboard

    Or go to Metabase at http://localhost:3000 to create and edit new plots with our freshly crunched data:

    • Email: admin@admin.com
    • Password: qwerty123

    Troubleshooting

    If Airflow is hanging or you are getting weird log messages from Druid:

    druid_1     | [Wed Apr 22 13:47:32 2020] Command[broker] exited (pid = 19, signal = 9)
    druid_1     | [Wed Apr 22 13:47:32 2020] Command[broker] failed, see logfile for more details: /opt/druid/var/sv/broker.log
    druid_1     | [Wed Apr 22 13:47:35 2020] Running command[broker], logging to[/opt/druid/var/sv/broker.log]: bin/run-druid broker conf/druid/single-server/nano-quickstart

    or other services:

    coronavirus_metabase_1 exited with code 137

    then it probably means you don’t have enough memory and docker is shutting down processes. Please increase memory available to docker and try again.

    Short description

    So what happened here? We just run a small but complete analytics pipeline on our pc, which involves the following steps:

    1. Getting the most recent data from Johns Hopkins dataset,
    2. Transforming it to a suitable format using Spark,
    3. And ingesting it into Druid, a high performance analytics data store.

    All the above steps were coordinated by Airflow, a workflow scheduler. So when we started coronavirus DAG, it executed the above steps and it will continue doing so every 3 hours, in order to fetch latest changes to the dataset.

    Lastly, we used Metabase, a powerful business intelligence platform, to query our data and create different visualizations.

    Enjoy!

    Visit original content creator repository https://github.com/alexnu/coronavirus