Blog

  • GravityView

    GravityView (Floaty loves you!)

    CircleCI

    GravityView is a commercial plugin available from https://www.gravitykit.com. The plugin is hosted here on a public GitHub repository to better facilitate community contributions from developers and users. If you have a suggestion, a bug report, or a patch for an issue, feel free to submit it here.

    If you are using the plugin on a live site, please purchase a valid license from the website. We cannot provide support to anyone that does not hold a valid license key.


    Installation Instructions

    To install the plugin, download the latest release to your WordPress plugins folder and then activate it.

    For Developers

    If you wish to make changes to the plugin, you need to install the necessary dependencies and compile assets. First, a couple of prerequisites:

    1. Make sure that you have the full plugin source code by either cloning this repo or downloading the source code (not the versioned release) from the Releases section.

    2. Install Composer

    3. Install Node.js

      • We recommend a Node.js version manager for Linux/macOS or Windows
      • Run npm install -g grunt-cli if this the first time you’ve installed Node.js or switched to a new version

    Next, install dependencies:

    1. Run composer install-public to install Composer dependencies, including development dependencies, or composer install-public-no-dev if you don’t need the development dependencies

      • If you have access to private GravityKit repositories, you can run composer install or composer install --no-dev instead
    2. Run npm install to install Node.js dependencies

    To compile/minify UI assets, run grunt or use the following commands separately:

    1. grunt sass & grunt postcss to compile and minify CSS files

    2. grunt uglify to minify JavaScript files

    3. grunt imagemin to minify images

    You do not have to run the commands if submitting a pull request as the minification process is handled by our CI/CD pipeline.

    Unit Tests

    We offer preconfigured Docker containers and a custom Bash script to facilitate running unit tests using multiple PHP versions in a predictable environment. Visit our Tooling repo for information regarding how to configure and run tests.

    If you wish to run tests using your local environment, use the following instructions:

    1. Clone the WordPress Develop and Gravity Forms repositories

    2. In the cloned repository folder, copy wp-tests-config-sample.php to wp-tests-config.php, and edit wp-tests-config.php to define the following constants:

      define('DB_NAME', getenv('DB_NAME'));
      define('DB_USER', getenv('DB_USER'));
      define('DB_PASSWORD', getenv('DB_PASSWORD'));
      define('DB_HOST', getenv('DB_HOST'));
    3. Run PHPUnit using the following command (ensure to replace placeholders with your actual system values):

      DB_NAME=db_name \
      DB_USER=db_user \
      DB_PASSWORD=db_password \
      DB_HOST=db_host \
      GF_PLUGIN_DIR=/path/to/gravityforms \
      WP_TESTS_DIR=/path/to/wordpress-develop/tests/phpunit \
      vendor/bin/phpunit --no-coverage

      Alternatively, you can copy phpunit.xml.dist to phpunit.xml, and edit phpunit.xml to set the environment variables there:

      <php>
          <const name="DOING_GRAVITYVIEW_TESTS" value="1" />
          <env name="DB_NAME" value="db_name"/>
          <env name="DB_USER" value="db_user"/>
          <env name="DB_PASSWORD" value="db_password"/>
          <env name="DB_HOST" value="db_host"/>
          <env name="GF_PLUGIN_DIR" value="/path/to/gravityforms"/>
          <env name="WP_TESTS_DIR" value="/path/to/wordpress-develop/tests/phpunit"/>
      </php>

    End-to-End Tests

    We use Playwright for end-to-end (E2E) testing against a WordPress environment bootstrapped in Docker using wp-env.

    To set up and run E2E tests:

    1. Run npm install to install Node.js dependencies.

    2. Copy .env.sample to .env and update it with the correct path to the Gravity Forms plugin and license keys.

    3. Run npm run tests:wp-env:setup to configure the environment, then run npm run tests:wp-env:run to execute the tests.

    To reset the database between test runs, use npm run tests:e2e:clean.


    Acknowledgements

    We are thankful to the following open source software that help enhance our plugin:

    Visit original content creator repository https://github.com/GravityKit/GravityView
  • clibard

    CLI bard — See all your last notifications in the terminal

    The CLI bard is a very simple command line application that displays the last notifications received on the D-Bus (the common notification system under Linux).

    It is not an interactive application, it just displays incoming notifications. At any time, as much as possible of the last notifications are displayed. The display refreshes when a notification is received.

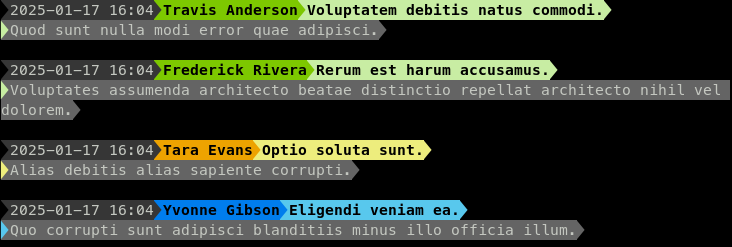
    Screenshot of the vertical layout

    The CLI bard is written in Python and is available under the AGPLv3 license.

    Install

    The CLI bard relies on your terminal using a font patched with the “Powerline” characters. The recommended fonts are the ones from the Nerd font project.

    Usage

    Command arguments

    usage: clibard.py [-h] [-l {h,v,horizontal,vertical}] [–test NB_ITEMS] [–send NB_ITEMS]

    options: -h, –help show this help message and exit -l {h,v,horizontal,vertical}, –layout {h,v,horizontal,vertical} How to display notifications. horizontal = as many of the last notifications that fit on a single line, clear out the old ones. vertical = keep printing new notifications on new lines. –test NB_ITEMS Print NB_ITEMS fake notifications and quit. –send NB_ITEMS Send NB_ITEMS fake notifications on the D-Bus and quit.

    Display

    Each notification is displayed as a colored block made of up to four segments, showing in order:

    1. the date,
    2. the application having issued the notification,
    3. the summary of the notification (e.g. chat systems usually display the user, here),
    4. the body of the message.

    The color of the notification block’s application and summary depends on the urgency of the notification:

    • low in green,
    • normal in blue,
    • critical in orange,
    • unknown in light purple.

    Signaling

    The CLI bard does respond to POSIX “user signals”. Signals can be issued with the kill command, using the --signal flag along with 10 (SIGUSR1) or 12 (SIGUSR2) as an argument. SIGUSR1 will refresh the display, SIGUSR2 will erase any notification in the cache and clear the display (if it can).

    Note that with the horizontal layout, refreshing the display actually changes the display. Erasing the cache will remove any on-screen notification if you use the horizontal layout. With the vertical layout, this does nothing on the display.

    Layouts

    The default layout is the horizontal one.

    Horizontal

    Screenshot of the horizontal layout

    This will display on a single line, and overwrite it as soon as an update is received. Dates are given in a “natural” human-readable way. When refreshing its display in the horizontal layout, the displayed dates will be refreshed as well. However, it does not show all the cached notifications, but only the few last ones that can fit the current width of the terminal.

    Vertical

    The vertical layout simply prints a new line as soon as the CLI bard receive a notification. The display cannot be cleared nor refreshed. Most notably, date is displayed in the ISO-8601 format, down to the minute. However, your terminal should retain all the received notifications, if you can scroll back enough.

    Visit original content creator repository https://github.com/nojhan/clibard
  • clibard

    CLI bard — See all your last notifications in the terminal

    The CLI bard is a very simple command line application that displays the last
    notifications received on the D-Bus (the common notification system under Linux).

    It is not an interactive application, it just displays incoming notifications.
    At any time, as much as possible of the last notifications are displayed.
    The display refreshes when a notification is received.

    Screenshot of the vertical layout

    The CLI bard is written in Python and is available under the AGPLv3 license.

    Install

    The CLI bard relies on your terminal using a font patched with the “Powerline”
    characters. The recommended fonts are the ones from the
    Nerd font project.

    Usage

    Command arguments

    usage: clibard.py [-h] [-l {h,v,horizontal,vertical}] [–test NB_ITEMS]
    [–send NB_ITEMS]

    options:
    -h, –help show this help message and exit
    -l {h,v,horizontal,vertical}, –layout {h,v,horizontal,vertical}
    How to display notifications. horizontal = as many of
    the last notifications that fit on a single line, clear
    out the old ones. vertical = keep printing new
    notifications on new lines.
    –test NB_ITEMS Print NB_ITEMS fake notifications and quit.
    –send NB_ITEMS Send NB_ITEMS fake notifications on the D-Bus and quit.

    Display

    Each notification is displayed as a colored block made of up to four segments,
    showing in order:

    1. the date,
    2. the application having issued the notification,
    3. the summary of the notification (e.g. chat systems usually display the user, here),
    4. the body of the message.

    The color of the notification block’s application and summary depends
    on the urgency of the notification:

    • low in green,
    • normal in blue,
    • critical in orange,
    • unknown in light purple.

    Signaling

    The CLI bard does respond to POSIX “user signals”.
    Signals can be issued with the kill command, using the --signal flag along
    with 10 (SIGUSR1) or 12 (SIGUSR2) as an argument.
    SIGUSR1 will refresh the display, SIGUSR2 will erase any notification in the
    cache and clear the display (if it can).

    Note that with the horizontal layout, refreshing the display actually changes
    the display. Erasing the cache will remove any on-screen notification
    if you use the horizontal layout.
    With the vertical layout, this does nothing on the display.

    Layouts

    The default layout is the horizontal one.

    Horizontal

    Screenshot of the horizontal layout

    This will display on a single line, and overwrite it as soon as an update is
    received.
    Dates are given in a “natural” human-readable way.
    When refreshing its display in the horizontal layout, the displayed dates will
    be refreshed as well.
    However, it does not show all the cached notifications, but only the few last
    ones that can fit the current width of the terminal.

    Vertical

    The vertical layout simply prints a new line as soon as the CLI bard receive
    a notification. The display cannot be cleared nor refreshed.
    Most notably, date is displayed in the ISO-8601 format, down to the minute.
    However, your terminal should retain all the received notifications,
    if you can scroll back enough.

    Visit original content creator repository
    https://github.com/nojhan/clibard

  • flynnt-minio-sample

    flynnt + argocd

    Deploy Minio on a Flynnt Cluster


    This repository contains resources that deploy an instance of Minio on a flynnt kubernetes cluster. It is build for private Cloud and on-premise environments.

    The deployment is GDPR/DSGVO-compliant. This means, no data stored in your ArgoCD instance will leave your server. As long as you use trusted infrastructure providers (for example your own datacenter) your data is safe.

    It is meant to be used for reference and as a blueprint for your own deployment.

    Special features of this deployment

    • Uses Hetzner Cloud and the Hetzner CSI Driver for compute nodes and as the StorageClass
    • You can optionally use ArgoCD for your deployment. This is recommended, but not mandatory. The alternative is plain Helm/Kustomize. See here for a sample on how to deploy ArgoCD

    Note

    Even though this sample is built to be deployed on a flynnt managed kubernetes cluster, you can easily customize this to use a different managed k8s provider. In general, almost every technology choice made here is opinionated and exchangeable with different products.

    Used Tooling

    We use several open-source tools and stitch them together for a nice, standalone deployment experience.

    • Terraform, Helm and Kustomize for deploying infrastructure, auxiliary apps and minio itself
    • Sops and Age for secret encryption and handling

    Binaries

    Prerequisites and External Dependencies

    • At least two nodes to use in your cluster in different availability zones. (You can use the terraform instructions from below)
    • An Ingress and Cert-Manager solution deployed to your cluster.
    • A way to point your preferred DNS record to your nodes for ingress.
    • A way to store secrets and share them with your team. As an example, a keepass database is sufficient.
    • A kubernetes cluster and access via kubectl to it. This example uses a flynnt cluster. Save the kubeconfig.yaml in the root of this repo.
    • (optional) A place to store the terraform state. If you work in a team, you should use some form of shared storage.
    • (optional) An external prometheus-compatible monitoring layer. Because of the shared failure-domain with the application, it’s not recommended to deploy prometheus, alertmanager and grafana in the same cluster.

    Getting Started

    Generate a new age secret

    We included the age-binaries in this repository. Feel free to update or remove them. They are only used for this step.

    ./age/age-keygen

    Copy the private and public key of the output and save it to your secret database. Both keys will be used throughout this repository.

    Deploy infrastructure with Terraform (optional)

    You should only do this, if your flynnt cluster does not have any nodes. This uses Hetzner Cloud to deploy compute nodes and you need an Hetzner API Key to use this.

    We have some secrets that we want to use with terraform. Namely, our hcloud_token and the flynnt_token. We obviously don’t want to store them in plain text in git, so we need to encrypt them first.

    To do this, there is a terraform/secrets.sample.yaml file in this repo. It contains sample values. Replace them with real values. Next, we encrypt the file to be used by terraform as variables.

    ./sops --encrypt --age <put-age-public-key-here> terraform/secrets.sample.yaml > terraform/secrets.enc.yaml

    Important Don’t commit the plain secrets file to git. The secrets.enc.yaml is fine to commit though. That’s the whole point of sops and age.

    Next, we will deploy the nodes through terraform and join them to a flynnt cluster. If you want to use a different backend to store your state, customize the terraform/main.tf accordingly. Also, check the terraform/terraform.tfvars file for the correct cluster name.

    export SOPS_AGE_KEY=<put-private-secret-key-here>
    terraform -chdir=terraform init -upgrade #(only on first deploy)
    terraform -chdir=terraform apply

    Check that the nodes are successfully added to the cluster. Either through the Flynnt Dashboard or directly by using kubectl get nodes

    Prepare k8s and sops secrets

    We need to provide two secrets for this deployment to work.

    The first is for the Hetzner CSI Driver to access the Hetzner API. This is optional if you are using a different CSI provider. It’s located in applications/hetzner-csi-driver/secrets.sample.yaml. Change it and encrypt it.

    ./sops --encrypt --age <put-age-public-key-here> applications/hetzner-csi-driver/secrets.sample.yaml > applications/hetzner-csi-driver/secrets.enc.yaml

    The second secret you need to change is in applications/minio/secrets.sample.yaml. This will be the login credentials for your tenant. Change them and encrypt the secret

    ./sops --encrypt --age <put-age-public-key-here> applications/minio/secrets.sample.yaml > applications/minio/secrets.enc.yaml

    Now you are ready to deploy Minio.

    Deploy Minio via ArgoCD (recommended)

    If you have ArgoCD installed in your cluster, you can simply customize the argocd-appliations.yaml to your needs. ArgoCD needs access to this repository if you want this to work.

    kubectl apply -f argocd-applications.yaml

    See this repository on how to install ArgoCD to your cluster.

    Note

    The Hetzner CSI Driver is included in this deployment. If your cluster is not using compute nodes from Hetzner, replace it with the StorageClass of your choice.

    Deploy Minio via Helm & Kustomize

    Deploying Hetzner CSI Driver (optional)

    This is optional if you already have a different CSI provider deployed. The kustomize below automatically decrypts the secret by using ksops. This is also exactly how ArgoCD would do it.

    export KUBECONFIG=kubeconfig.yaml
    ./kustomize build --enable-alpha-plugins --enable-exec applications/hetzner-csi-driver | kubectl apply -f -
    

    Deploying Operator & Tenant

    First, we need the Minio Operator. We use the default values. So no separate values.yaml.

    export KUBECONFIG=kubeconfig.yaml
    ./helm repo add minio https://operator.min.io/
    ./helm upgrade --install --namespace minio-operator --create-namespace --version 5.0.9 minio-operator minio/operator

    Now deploy the actual tenant. Customize applications/minio/values.yaml and add your Ingress domain and TLS configuration. The sample configuration works for ingess-nginx and cert-manager.

    export KUBECONFIG=kubeconfig.yaml
    ./kustomize build --enable-alpha-plugins --enable-exec applications/minio | kubectl apply -f -
    ./helm repo add minio https://operator.min.io/
    ./helm upgrade --install --values applications/minio/values.yaml --namespace minio-tenant --create-namespace --version 5.0.9 tenant-1 minio/tenant

    You should now be able to access your Minio Tenant console and buckets through the configured Ingress.

    Encryption of secrets

    We use sops and age.

    Editing the secrets file inline:

    SOPS_AGE_KEY=<put-secret-key-here> ./sops -i secrets.enc.yaml
    Visit original content creator repository https://github.com/flynnt-io/flynnt-minio-sample
  • advanced-mars-rover-kata

    advanced-mars-rover-kata

    Improve basic mars rovert kata with spring boot, docker, etc

    JAVA – Martian Robots

    The problem

    The surface of Mars can be modelled by a rectangular grid around which robots are
    able to move according to instructions provided from Earth. You are to write a
    program that determines each sequence of robot positions and reports the final
    position of the robot.
    A robot position consists of a grid coordinate (a pair of integers: x-coordinate followed
    by y-coordinate) and an orientation (N, S, E, W for north, south, east, and west). A
    robot instruction is a string of the letters “L”, “R”, and “F” which represent,
    respectively, the instructions

    • Left: the robot turns left 90 degrees and remains on the current grid point.
    • Right: the robot turns right 90 degrees and remains on the current grid point.
    • Forward: the robot moves forward one grid point in the direction of the current
      orientation and maintains the same orientation.

    The direction North corresponds to the direction from grid point (x, y) to grid point (x,
    y+1).

    There is also a possibility that additional command types may be required in the
    future and provision should be made for this.
    Since the grid is rectangular and bounded (…yes Mars is a strange planet), a robot
    that moves “off” an edge of the grid is lost forever. However, lost robots leave a robot
    “scent” that prohibits future robots from dropping off the world at the same grid point.
    The scent is left at the last grid position the robot occupied before disappearing over
    the edge. An instruction to move “off” the world from a grid point from which a robot
    has been previously lost is simply ignored by the current robot

    The input

    The first line of input is the upper-right coordinates of the rectangular world, the
    lower-left coordinates are assumed to be 0, 0.

    The remaining input consists of a sequence of robot positions and instructions (two
    lines per robot). A position consists of two integers specifying the initial coordinates
    of the robot and an orientation (N, S, E, W), all separated by whitespace on one line.

    A robot instruction is a string of the letters “L”, “R”, and “F” on one line.
    Each robot is processed sequentially, i.e., finishes executing the robot instructions
    before the next robot begins execution.

    The maximum value for any coordinate is 50.

    All instruction strings will be less than 100 characters in length

    The output

    For each robot position/instruction in the input, the output should indicate the final
    grid position and orientation of the robot. If a robot falls off the edge of the grid the
    word “LOST” should be printed after the position and orientation.

    Sample input

    	5 3
    	1 1 E
    	RFRFRFRF
    	3 2 N
    	FRRFLLFFRRFLL
    	0 3 W
    	LLFFFLFLFL
    

    Sample output

    	1 1 E
    	3 3 N LOST
    	2 3 S
    

    Features

    This project has 2 submodules

    • Navigation
    • Web

    you can execute the feature using anyone of them. Please check the readme file of any of them in order to retrive more information.

    Navigation module

    Includes a jar project that can read files from disc as input and generate result files with the result of the operations

    Web

    Includes a spring boot project with 2 API rest in order to execute the commands and retrieve useful information

    Visit original content creator repository
    https://github.com/albertoSenserrich/advanced-mars-rover-kata

  • xrootd-lcmaps

    LCMAPS Callout for XRootD

    This XRootD plugin provides a way to integrate the XRootD authorization subsystem with the
    LCMAPS authorization infrastructure. This allows for a site’s configuration
    of GSI and VOMS-based authentication and authorization to apply to an XRootD service.

    The LCMAPS callout provides the XRootD authorization subsystem with:

    • A Unix username corresponding to the GSI / VOMS identity.
    • The corresponding end-entity-credential subject (colloquially known as the user’s DN).
    • VOMS information such as the corresponding VO and VOMS role.
    • The credential’s VOMS groups as the list of XRootD groups.

    It works with both the XRootD and HTTPS protocol interfaces for XRootD.

    Compiling

    The plugin requires:

    • A working C++11 compiler,
    • CMake 2.6 or later,
    • The XRootD server headers (4.x or later),
    • Globus development headers (globus-gsi-credential, globus-gsi-cert-utils),
    • and the LCMAPS headers (and version from 2014 or later).

    To compile, we recommend an out-of-source build. From an empty directory, run:

    cmake ../path/to/source
    make
    make install
    

    Configuration

    The following lines in the XRootD configuration file will enable the LCMAPS plugin based on /etc/lcmaps.db

    sec.protocol /usr/lib64 gsi -certdir:/etc/grid-security/certificates -cert:/etc/grid-security/xrd/xrdcert.pem \
                                -key:/etc/grid-security/xrd/xrdkey.pem \
                                -crl:1 \
                                -authzfun:libXrdLcmaps.so \
                                -authzfunparms:lcmapscfg=/etc/lcmaps.db,loglevel=0 \
                                -gmapopt:10 \
                                -gmapto:0
    
    http.secxtractor /usr/lib64/libXrdLcmaps.so
    

    Only the library name (/usr/lib64/libXrdLcmaps.so) and the -authzfun/-authzfunparms are relevant to the plugins;
    the remaining arguments are simply part of the XRootD configuration.

    The following command line flags are accepted:

    • lcmapscfg: Filename of the configuration file. If not specified, it uses /etc/lcmaps.db.
    • loglevel: The LCMAPS log level. LCMAPS typically logs to syslog (/var/log/messages). 0 is default for XRootD, but
      higher levels may be useful for debugging.
    • policy: The policy to execute out of the LCMAPS configuration file; defaults to one named xrootd_policy.

    Note that osg used to be a separate flag for this plug-in; it is no longer applicable and is ignored.

    Visit original content creator repository
    https://github.com/opensciencegrid/xrootd-lcmaps

  • xselector

    xSelector

    npm

    Use CSS Selector, XPath 1.0 or RegExp select data from HTML, inspired by scrapy.

    Install

    npm i -P xselector
    

    Useage

    const selector = reuqire('xselector');
    let sel = selector.load(html);
    
    sel.xpath('//div').css('img').attr('src');
    // need to use relative path
    sel.css('body').xpath('./div//img/@src').values();
    sel.regexp(/<title>([^<]+)<\/title>/);

    API

    selector.load(html [, options])

    arguments:

    • html string:
    • options object: options of xmldom.

    return: Selector

    class Selector

    extends SelectorList.

    class SelectorList

    • SelectorList#css(selector): SelectorList
    • SelectorList#xpath(path): SelectorList

    operate first selected value

    • SelectorList#attr(name): string
    • SelectorList#text(): string
    • SelectorList#html(): string
    • SelectorList#value(): string
      • If selected value is Element, return html;
      • If selected value is Text|Attr, return nodeValue;
      • If selected value is string|number|boolean, return itself.
    • SelectorList#regexp(re [, searchText]): string
      • re string|RegExp: a pattern to match a part of string, if re has match groups, return first match group.
      • searchText boolean: If true, its context is Selector#text(); If false, its context is Selector#html(). Default is false.

    operate all selected value

    • SelectorList#attrs(name): string[]
    • SelectorList#texts(): string[]
    • SelectorList#htmls(): string[]
    • SelectorList#values(): string[]
    • SelectorList#regexps(re [, searchText]): string[]

    Contribution

    Submit the issues if you find any bug or have any suggestion.

    Or fork the repo and submit pull requests.

    About

    Author:plylrnsdy

    Github:xselector

    Visit original content creator repository https://github.com/plylrnsdy/xselector
  • mt4odbc

    mt4odbc

    Yet another MT4-ODBC bridge, and some scripts.

    Most of DBMS provides its ODBC driver, you can access any DBMS from your MQL programs. You can write more complex EAs, useful scripts, etc.

    Notice these codes are writtern for my personal use and not intended to develop fully products.
    I will maintain and fix bugs if I found or I need, but may not be fixed if I think I don’t need.
    Yes you can use these codes by your own risk and rewrite for yourself.

    WIPWIPWIP

    Environment

    You need Microsoft Visual C++ 2017 Redistributable x86 (https://go.microsoft.com/fwlink/?LinkId=746571)
    MT4 is 32bit application, so you need 32bit ODBC/redistributable. NOT x64 even though OS is 64bit.

    Install

    • Copy .\MQL4 to your MT4 data folder. You can open MT4 data folder by File -> Open Datafolder menu.
    • Install ODBC driver
    • Set up ODBC datasource
    • Include odbc.mqh from your MQL scripts.

    Sample

    See \MQL4\Scripts\export.mq4

    Use

    #include <Odbc.mqh>

    Init, Connect/ DeInit

    int OnInit() { 
    	if (!OdbcInitEnv()) { 
    	  return (INIT_FAILED); 
    	} 
    	// In the case of SQLite3,  
    	if (!OdbcConnect(dsName, userName, password)) { 
    		return (INIT_FAILED); 
    	} 
    	return(INIT_SUCCEEDED); 
    } 
    
    void OnDeinit(const int reason) { 
    	OdbcDisconnect();
    	OdbcDeInitEnv(); 
    }
    

    Insert/ Update / Delete

      string sql = StringConcatenate("insert into usdjpy (time, open, high, low, close) values ('", 
                     dt, "',", open, ",", high, ",", low, ",", close, ")"); // Prepare/placefolder is not supported. 
      if (!OdbcExecute(sql)) { // result is true/false. if you want last insert ID, use select last_insert_rowid() / last_insert_id() (Depends on DBMS) 
         Print("Insert failed."); 
         Print(OdbcErrorCode(), OdbcErrorMsg()); // You can get error reason 
      } 
    

    Query

    ulong sth = OdbcQuery("select * from foo"); // You can open more than one cursor 
    if (sth == 0) { 
    	ERROR 
    } 
    OdbcBindColInt(sth); // First column as int 
    OdbcBindColDouble(sth); // Second column as double 
    OdbcBindColLong(sth); // 3rd column as long 
    OdbcBindColString(sth); // 4th column as string 
    
    while(OdbcFetch(sth)) { 
    	if (OdbcIsNull(sth, 4)) { // Null check. Column no is base 1. Not base 0
    		string str = OdbcGetColString(sth, 4); // if the column is null, return "" or 0 
    	} 
    } 
    OdbCloseStmt(sth); // Free buffer. Don't forget without you want memory leak. 
    

    Restrictions

    • Working 2 or more EAs are not tested.
    • date/time is not supported. Use string or int(unix time or something).

    Visit original content creator repository
    https://github.com/rami1942/mt4odbc

  • react-yan-progress

    react-yan-progress

    NPM version Build Status Coverage Status

    This is a cascading progress bar component based on react yan-progress

    Installation

    $ npm install react-yan-progress

    Qucik start

    import React from "react";
    import ReactDOM from "react-dom";
    import YanProgress from 'react-yan-progress';
    
    function App() {
      return (
        <div className="App">
          <YanProgress total={100} done={60} modify={30} />
        </div>
      );
    }
    
    const rootElement = document.getElementById("root");
    ReactDOM.render(<App />, rootElement);

    API

    params description type default
    total The total of progress number
    done The number of done number
    modify The number of modified base on done number
    tip Custom Style (Array contains 3 items, in turn: uncomplete, done, and modified, each item configuration as shown in iTipConfig below) iTipConfig

    iTipConfig

    params description type memo
    text The tooltip text (‘X’is a placeholder) string The color type same with CSS
    fillStyle The background color of progress bar string The color type same with CSS

    Test

    $ yarn run test

    Dev

    link react-yan-progress

    $ yarn link

    test test-demo

    $ yarn link react-yan-progress

    unlink react-yan-progress

    $ yarn unlink

    Contributing

    • Fork this Repo first
    • Clone your Repo
    • Install dependencies by $ npm install
    • Checkout a feature branch
    • Feel free to add your features
    • Make sure your features are fully tested
    • Publish your local branch, Open a pull request
    • Enjoy hacking <3

    MIT license

    Copyright (c) 2018

    Permission is hereby granted, free of charge, to any person obtaining a copy of this software and associated documentation files (the “Software”), to deal in the Software without restriction, including without limitation the rights to use, copy, modify, merge, publish, distribute, sublicense, and/or sell copies of the Software, and to permit persons to whom the Software is furnished to do so, subject to the following conditions:

    The above copyright notice and this permission notice shall be included in all copies or substantial portions of the Software.

    THE SOFTWARE IS PROVIDED “AS IS”, WITHOUT WARRANTY OF ANY KIND, EXPRESS OR IMPLIED, INCLUDING BUT NOT LIMITED TO THE WARRANTIES OF MERCHANTABILITY, FITNESS FOR A PARTICULAR PURPOSE AND NONINFRINGEMENT. IN NO EVENT SHALL THE AUTHORS OR COPYRIGHT HOLDERS BE LIABLE FOR ANY CLAIM, DAMAGES OR OTHER LIABILITY, WHETHER IN AN ACTION OF CONTRACT, TORT OR OTHERWISE, ARISING FROM, OUT OF OR IN CONNECTION WITH THE SOFTWARE OR THE USE OR OTHER DEALINGS IN THE SOFTWARE.


    built upon love by docor v0.3.0

    Visit original content creator repository https://github.com/Yangfan2016/react-yan-progress